 Previous
Five Essential Elder Scrolls V: Skyrim Tweaks
Note that this is an archived copy of the original article. Please see here for a more detailed explanation.
November 23rd, 2011
By Andrew Burnes
Since The Elder Scrolls V: Skyrim’s release on November 11th, Bethesda Game Studios’ role-playing game has received near-perfect review scores, has been played by over 280,000 people simultaneously on Steam, and has helped the service record its highest concurrent user count to date (4.6 million). Out of the box the open-world title is a looker, but like any good PC game its visuals can be modified and improved by even the most inexperienced user, and in this guide we’ll show you how to quickly implement five tweaks that are guaranteed to work.
Before We Begin...
Skyrim uses .ini files to store settings, which are then read and implemented at startup. These plain text .ini files can be modified using any editor such as Windows Notepad or Notepad++. The .ini files we’ll be editing are found in My Documents\My Games\Skyrim.
Importantly, if things go awry and you haven’t backed up the files, or if you suspect that your adjustments to them are causing issues in-game, you can simply delete them and let Skyrim recreate the files the next time you load-up.
After tweaking, changes made in the Skyrim configuration tool will likely result in your alterations being reset. To prevent this, save the .ini files, and then right click them in the folder, selecting ‘Properties,’ and then ‘Read Only’ to lock them. If further tweaks are required unlock and then re-lock once more.
Ambient Occlusion
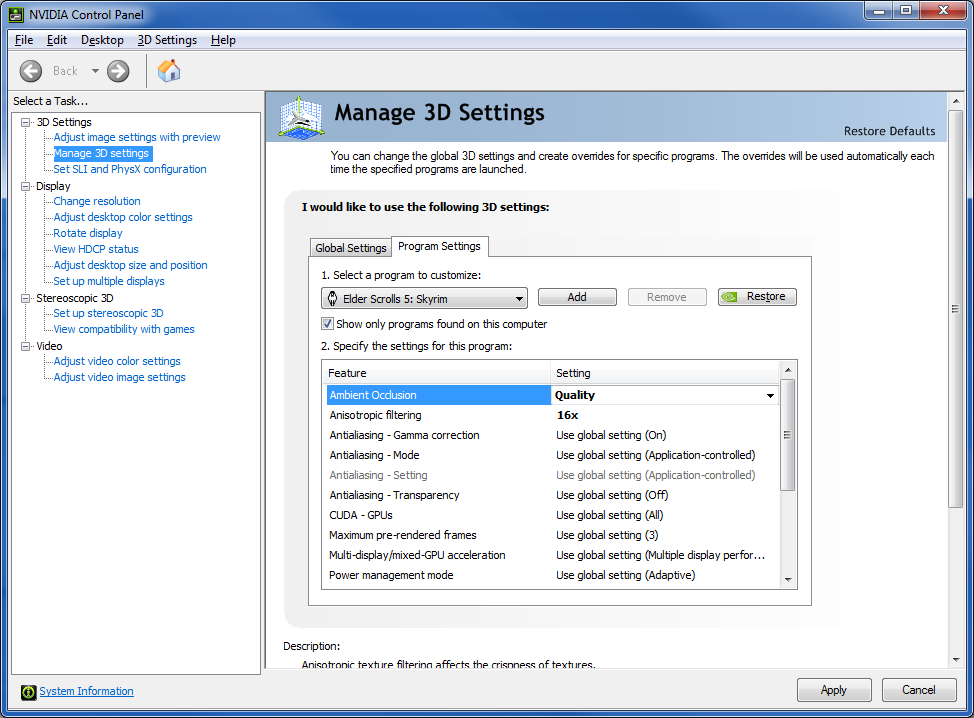
In the new 290.36 NVIDIA GeForce beta drivers you can enable Ambient Occlusion in Skyrim via the NVIDIA Control Panel, giving you richer, more realistic shadowing that can greatly increase overall scene fidelity. To do this:
- Open the NVIDIA Control Panel, click ‘Manage 3D Settings’ in the ‘3D Settings’ section of the left-hand pane, click the 'Program Settings' tab, and then select 'Elder Scrolls 5: Skyrim' in the drop-down list. If you can't see it, uncheck the 'Show only programs found on this computer' box and try again.
- Set 'Ambient Occlusion' to 'Quality' or 'Performance.'
- Click the Apply button.
Alternatively, you can download and install a third-party tool called NVIDIA Inspector, which exposes a third Ambient Occlusion mode, High Quality. Please note that we cannot offer support for this tool, and though it is unlikely to cause any kind of damage to your system we cannot guarantee as much. Thousands of people have used the tool to date and we’ve never heard of it causing irreparable damage to a system when used as laid out below. Any undesirable changes made by random clicking or from your cat walking over the keyboard can be undone, so don’t fret too much – just follow our directions and you should be fine.
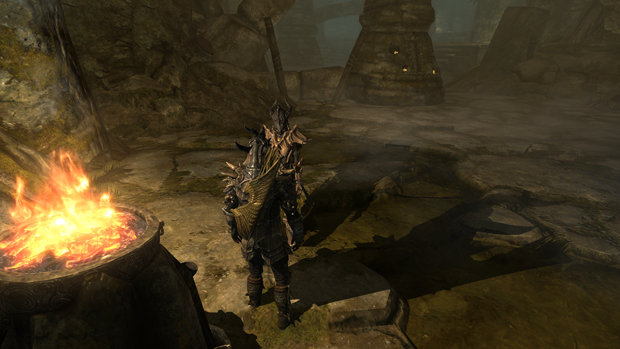
The in-game improvements you can expect to see from enabling Ambient Occlusion are exemplified by the following comparison images:

As the images hopefully show, Ambient Occlusion adds massively to the game, enriching every single scene, every single object, and every single character. In fact, it’s our firm belief that Ambient Occlusion is the most important tweak in this entire guide for improving overall fidelity. Other tweaks improve specific elements of the game, whereas Ambient Occlusion improves everything.
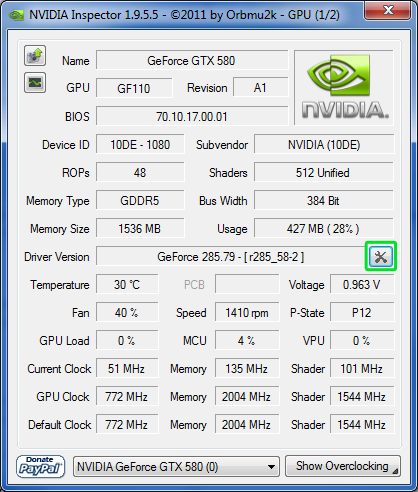
To implement the Ambient Occlusion tweak load the now-installed NVIDIA Inspector and click the marked button.
In the new window that appears click the drop-down on the top left and scroll to ‘Elder Scrolls 5: Skyrim.’ By default the visible settings should appear as follows:
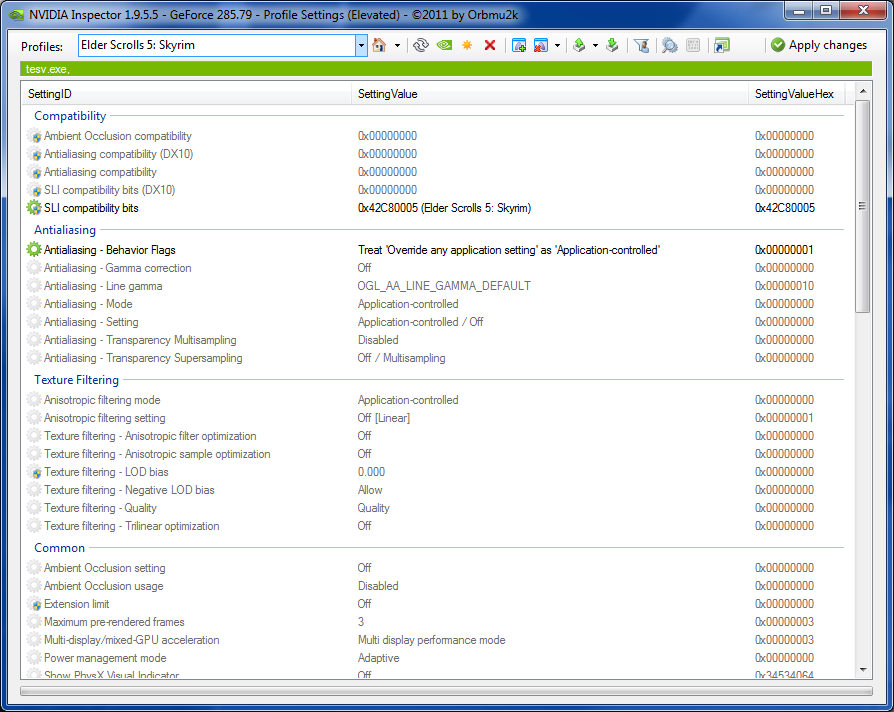
The default profile settings for Skyrim, as shown in NVIDIA Inspector.
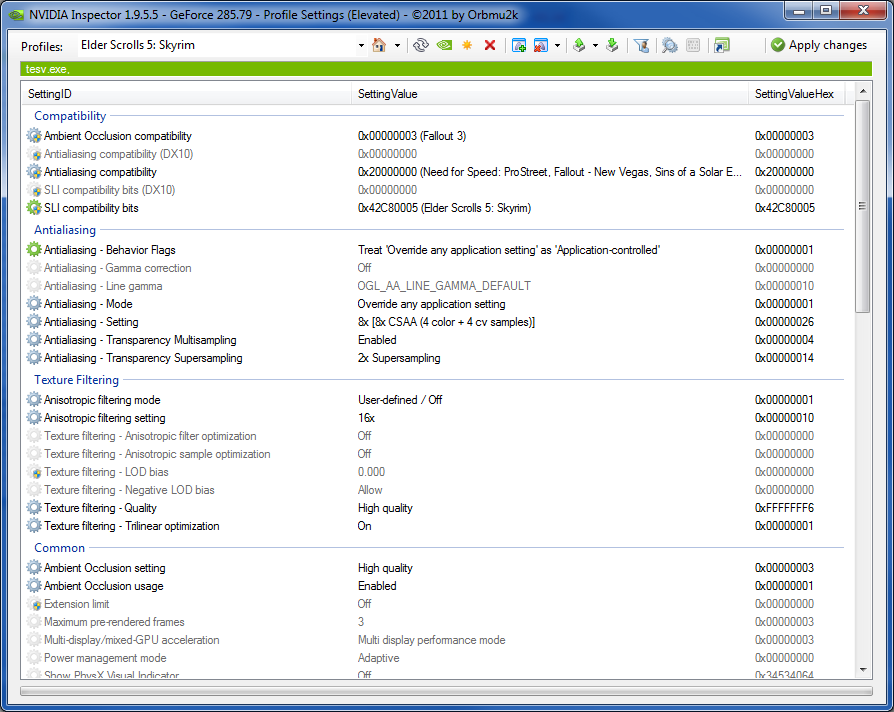
Modify these settings so they appear as shown below, and then click ‘Apply Changes’ on the top right of the window. If you need to undo a setting, click it, and then click the small NVIDIA icon that appears on the far right.

The modified values that should be duplicated to enable Skyrim's Ambient Occlusion.
If you experience unsatisfactory performance in-game from implementing this tweak you can use the less intensive ‘Performance’ and ‘Quality’ Ambient Occlusion modes via the ‘Ambient Occlusion setting’ drop-down. The difference between the three listed modes isn’t massive, so if you’re dropping too many frames per second downgrade to the lowest quality mode, 'Performance.'
High Quality Anisotropic Texture Filtering
By default, Skyrim uses little in the way of high quality Anisotropic Filtering (AF), a method of sharpening textures, thereby increasing detail and fidelity. A detailed explanation can be found here, but the long and short of the matter is that you can significantly improve Skyrim’s visuals for the cost of only a few frames per second.
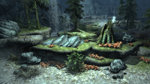
As you can see in the example below the water appears more detailed, as do textures, tress and distance details, such as the snow on the mountains:
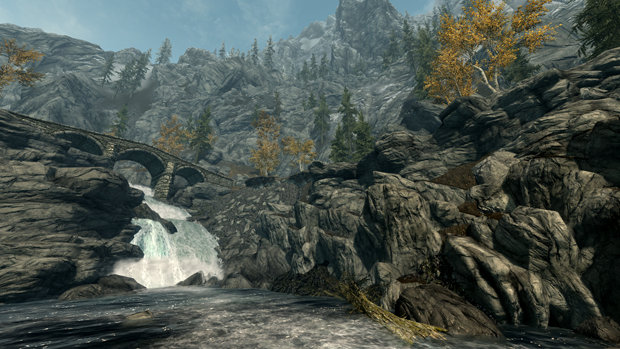
Click to enlarge and examine the comparison image.
Our second example shows a noticeable difference in the quality of nearby textures across the scene, and overall fidelity:
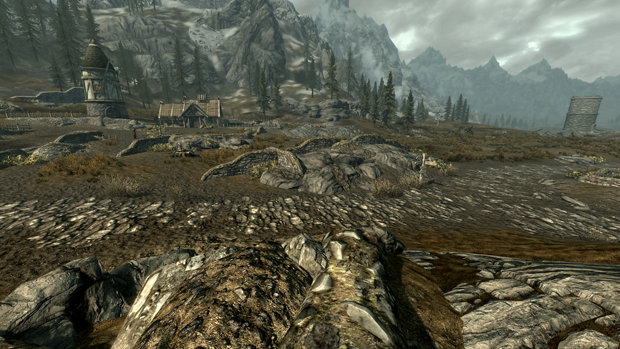
Click to enlarge and examine the comparison image.
To implement this tweak you can either use NVIDIA Inspector, or the NVIDIA Control Panel. In Inspector, modify the settings to appear as shown (these settings should be applied in addition to the earlier Ambient Occlusion changes if you intend to use both tweaks):

The settings that should be duplicated in NVIDIA Inspector to enable High Quality Anisotropic Texture Filtering.
GeForce.com's tweaked Skyrim profile as it exists now: recommended only for top-end systems using GTX 580 graphics cards or SLI configurations.
Alternatively, follow these steps using the NVIDIA Control Panel:
- Open the NVIDIA Control Panel, click ‘Manage 3D Settings’ in the ‘3D Settings’ section of the left-hand pane, click the 'Program Settings' tab, and then select 'Elder Scrolls 5: Skyrim' in the drop-down list. If you can't see it, uncheck the 'Show only programs found on this computer' box and try again.
- Set 'Anisotropic Filtering' to 16x.
- Set the 'Texture Filtering - Quality' option further down the list of settings to 'High Quality.'
- Click the Apply button.
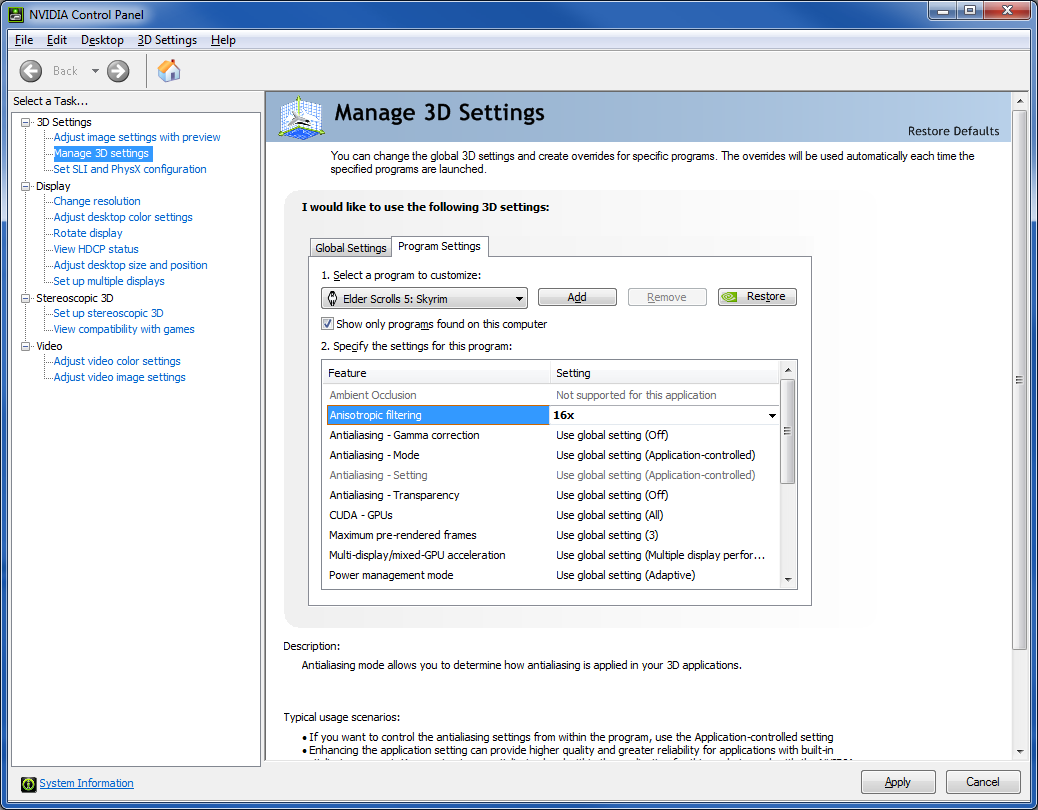
The Anisotropic Filtering setting that should be replicated in the NVIDIA Control Panel.

The Texture Filtering setting, located further down the page, that should also be replicated.
If you experience unsatisfactory performance in-game from implementing this tweak you can reduce the amount of Anisotropic Filtering and/or reduce the quality of the Texture Filtering.
Shadow Quality
Shadows in Skyrim are a curious beast, their overall quality being directly linked to the distance at which they are visible, meaning that if you want the sharpest possible shadows you have to severely limit the distance at which they appear, resulting in unsightly pop-in as they suddenly come into existence as you enter their ‘activation range.’
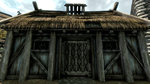
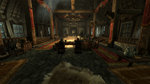
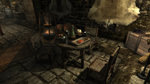
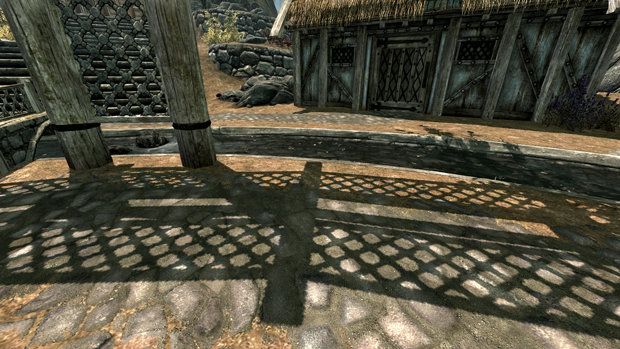
Using the shadow tweaks that we’ll now detail, you should expect to see improvements along these lines:
Interior shadows are sharper and more defined with the tweaks enabled.

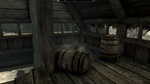
Exterior shadows are also better defined, though the blockiness persists due to the way the shadow technique operates.
This final example shows the leap in shadow quality that occurs when reducing shadow draw distance to 4000, from 8000.
To implement these tweaks open SkyrimPrefs.ini in your My Documents\My Games\Skyrim folder, scroll down to the [Display] section, and implement the following changes (further info about each individual part of this tweak is listed to the right of the setting):
- iBlurDeferredShadowMask=0 // Increases the sharpness of shadows. 0 is the best setting; 7 the worst.
- fInteriorShadowDistance=3000.0000 // Leave as is. Increasing the value has no noticeable effect beyond reducing the quality of indoor shadows, and decreasing the value causes unsightly fade-in.
- fShadowDistance=8000.0000 // Determines the distance at which shadows appear outside, as referred to earlier. 8000 is recommended to avoid shadow pop-in and is Bethesda’s optimized value. Lowering the number increases shadow detail by a significant degree, as you can see in our third example, and as such we urge you to experiment with this setting until you find a balance between quality and view distance that you are happy with.
- iShadowMapResolutionSecondary=4096 // Increases the detail level of shadows. The max setting, 8192, massively improves shadow quality, but in our testing we discovered a few objects and areas that absolutely crippled performance on even our beefiest machines when using 8192, but not 4096. As such we recommend sticking with this lower setting. Other possible values are 2048 and 1024.
- iShadowMapResolutionPrimary=4096 // As above.

The SkyrimPrefs.ini file as it appears before tweakage has occurred.

And this is how the file should look after you've tweaked.
The performance impact of this tweak is linked directly to the ShadowMapResolution settings. The defaults for Ultra are 1024 and 2048, respectively, which means that the performance ‘cost’ of Secondary shadowing will quadruple, and the cost of Primary shadowing double. If you’re losing too many frames per second lower the Secondary value first, and then the Primary if problems persist. iBlurDeferredShadowMask will have, at most, a few frames per second impact when going from the Ultra default, 3, to our setting, 0.
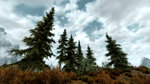
Tree Self-Shadowing
For some unknown reason the self-shadowing of trees is disabled by default in Skyrim, and the option to enable them located only in SkyrimPrefs.ini. By enabling this low-cost effect the visual quality of the game’s many trees is massively improved, as can be seen in the following example:
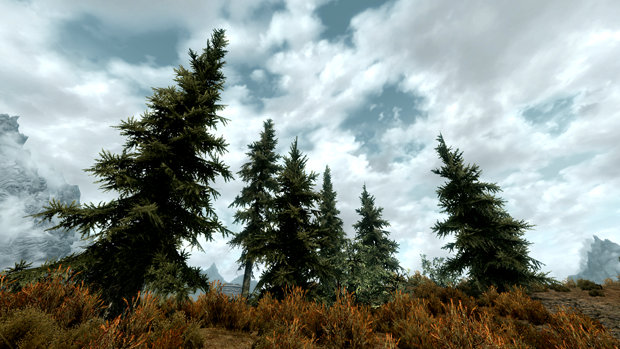
This difference is immediately evident in this Tree Self-Shadowing comparison. Being an overcast day, little light reaches the inner portions of the tree, resulting in deep, dark shadows.
To enable this tweak locate bTreesReceiveShadows=0 in SkyrimPrefs.ini in the [General] section of the file, and simply change 0 to 1. That’s it, you’re done. Save the file and set it back to Read Only.

The SkyrimPrefs.ini file as it appears before the tweak has been implemented.
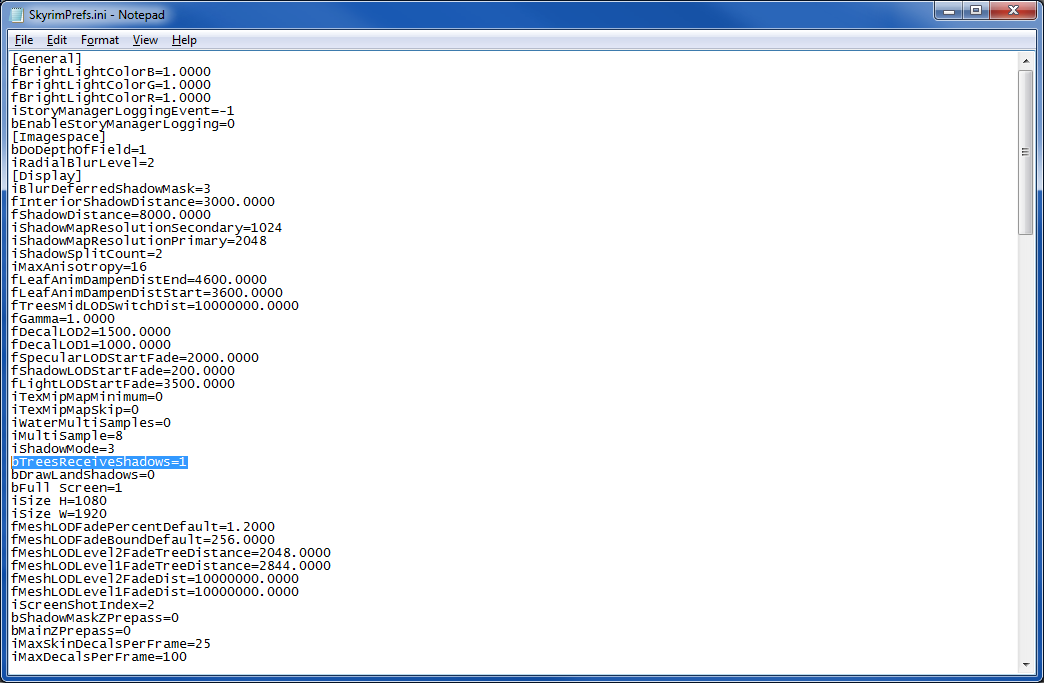
The same file following the change from bTreesReceiveShadows=0 to bTreesReceiveShadows=1.
Please note that several guides suggest users also enable bDrawLandShadows, located just below bTreesReceiveShadows. In our experience, there is no change whatsoever with it ‘on.’
uGrids
The worlds in Bethesda’s role-playing games are split into hundreds of thousands of sections (uGrids). By default, Skyrim loads the five nearest sections within your line of sight, plus the one your character inhabits. Beyond those five sections the entire world is rendered using low-detail trees, objects, and terrain, which, for the most part, cannot be modified or enhanced by .ini tweaks.
On a mid-to-high end system this setting can be tweaked, forcing the game to load seven sections, dramatically improving scene quality in many locations. Higher values, such as nine and eleven, are extremely unstable and therefore only recommended for users wanting to create wallpaper-worthy screenshots.
By rendering this extra detail your frame rate will be reduced (to what extent is impossible to say as this reduction can vary wildly from scene to scene). Furthermore, each section is loaded from the hard drive as a character moves through the world, and so higher uGrid values can cause hard drive thrashing, which may result in massive, temporary performance drops as the game catches up. On our Western Digital Caviar Black, 7200RPM drives this did not occur, but on slower ones it might, so your mileage with this tweak may vary.
One final caveat: altering the uGrid setting will modify your save game. If you ever wish to revert to a lower uGrid setting due to performance issues, the correct procedure must be followed to ensure that you do not make that save inaccessible, or possibly even corrupt, resulting in the complete loss of your character data and game progression. In all our tests we have followed these steps precisely and have never had a problem, but if this thought still scares you silly back up the entire ‘Saves’ folder in My Documents\My Games\Skyrim before you begin tweaking.
Now, let’s get to the fun bit: comparing uGridsToLoad=7 against the default value, uGridsToLoad=5.
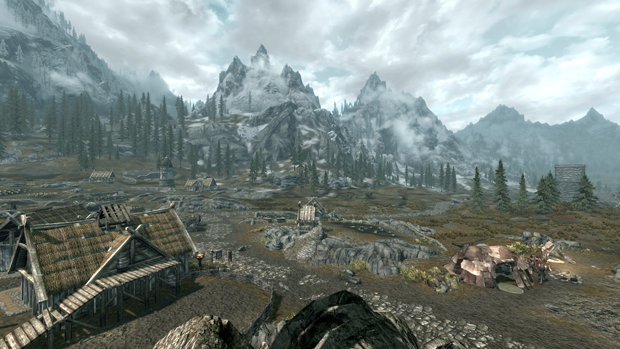
Note the massive difference in distance object detail in this uGrids comparison.
In the pictured scene we lost three frames per second by enabling uGridsToLoad=7, which is fine by us considering the dramatic improvement in overall fidelity. To implement this tweak open Skyrim.ini in My Documents\My Games\Skyrim. At the very top, in the [General] section, change uExterior Cell Buffer=36 to uExterior Cell Buffer=64. This value should always be (uGridsToLoad + 1)^2. In our case, 7+1x8=64. Broken down, that’s the seven nearest grids to load, plus the one your character inhabits, multiplied by the result.
Directly below uExterior Cell Buffer=64, add uGridsToLoad=7 to the file. This number can only be ‘odd,’ and as mentioned earlier values above 7 are incredibly unstable. Save the file and set it to Read Only.

The Skyrim.ini file as seen when using the default uGrid values.
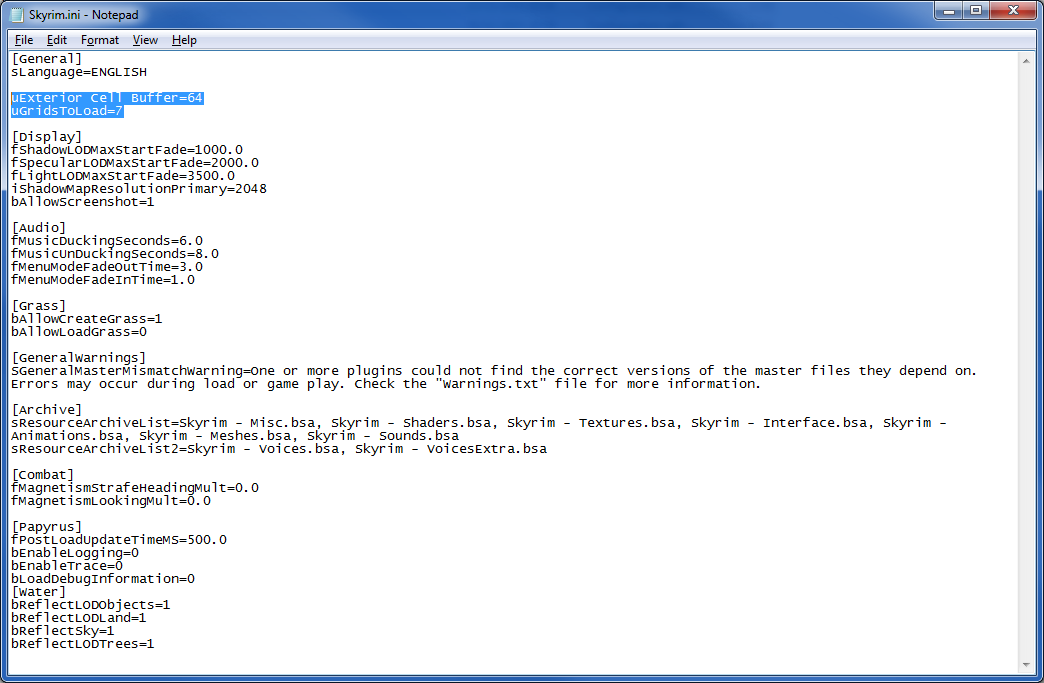
The same file after the uGridsToLoad=7 tweak has been implemented.
Now, let’s go through the steps to revert back to uGridsToLoad=5 should the tweak prove too demanding for your system, or if Skyrim becomes unstable:
- Backup SkyrimPrefs.ini, Skyrim.ini and your Skyrim ‘Saves’ folder.
- Right click on Skyrim.ini in My Documents\My Games\Skyrim and uncheck ‘Read Only’ in the file’s properties.
- Load your last save game.
- Press tilde on your keyboard, most commonly placed directly to the left of ‘1.’ If it is elsewhere, the keyboard symbol should be ` or ~.
- In the now-visible in-game console type setini “ugridstoload:general” 5
- Hit Return on your keyboard.
- Type saveini
- Hit Return on your keyboard.
- Type refreshini
- Hit Return on your keyboard.
- Close the console using tilde.
- Create a new save game.
- Exit Skyrim.
- Delete Skyrim.ini in My Documents\My Games\Skyrim.
- Reload the Skyrim configuration tool.
- Close the tool.
- Re-tweak Skyrim.ini if necessary (and SkyrimPrefs.ini if it has since been modified).
- Reload Skyrim and your most recent save.
- Enjoy the game.
The process sounds time consuming when detailed as above, but in practice it takes only a few minutes to revert uGridsToLoad to 5, so we definitely encourage you to give uGridsToLoad=7 a whirl as it really does improve the overall quality of the game’s graphics by a significant degree. Note that if you only test the performance impact, and never save the game, you only need to undo the Skyrim.ini changes to revert back to uGridsToLoad=5.
Conclusion
If you’ve followed this guide the entire way through and enabled every single tweak the eponymous world of Skyrim should look a whole lot nicer now. And what’s more, these were just five of many possible tweaks; in the near future GeForce.com will publish an extensive Tweak Guide examining every single tweakable setting in the game and its .ini files, and their impact on performance. Edit: That tweak guide is avaiable here.
Comments
This comment section is currently disabled. Click here to enable comments and load all Disqus related resources
Please note that by enabling and loading these Disqus resources, you are agreeing to allow everything that comes with a Disqus comment section, including their cookies and all scripting.
This comment section is currently enabled. Click here to disable comments and unload all Disqus related resources
Please note that I have absolutely zero control over this comment section. It is still administered entirely by Nvidia themselves. I have no moderation power whatsoever and don't necessarily endorse any of the comments posted here. In fact, I don't believe this comment section adds much value to the article to begin with but included it only because it existed on the original.