Introduction
Note that this is an archived copy of the original article. Please see here for a more detailed explanation.

With the launch of the GeForce GTX 680 it is now possible to run an entire Surround setup on just the one graphics card. In this guide, we’ll show how to correctly configure 2D Surround and 3D Vision Surround systems using all available ports and connectors, and combinations of video cards, be that one card, two cards in 2-Way SLI, or three cards in 3-Way SLI.
For further details regarding the new Surround capabilities of the GeForce GTX 680, please read our comprehensive ‘Surround On The GeForce GTX 680’ article.
Monitor Prerequisites
- In 2D Surround, any combination of monitors that share common timings will work but if the displays are not identical this may result in a lower than optimal resolution, and each must have, at minimum, one DVI, HDMI, or DisplayPort connector. Aesthetically, identical monitors are preferable, but not a requirement.
- In 3D Vision Surround, each monitor must be an identical make and model, and you must use three matching digital connectors. We will go into detail below, but you may need additional adapters for this.
- The Accessory Display, the forth monitor, does not have to be identical to the three Surround displays, but does require one of the three possible connectors.
Available Ports & Adapters
The GeForce GTX 680 sports two DVI connectors, one HDMI connector, and one DisplayPort connector. In 2D Surround, gamers can use any of the four display connectors to power their Surround setup, and the fourth display connector for the Accessory Display.
In 3D Vision Surround, any monitor connected to the DisplayPort output must use a DisplayPort to Dual-Link DVI adapter so that all three monitors are using Dual-Link DVI. Adapters are available from Club 3D, and other e-tailers. In future drivers, owners of BenQ’s XL2420T and XL2420TX 3D Vision monitors will be able to use the two DVI connectors and the DisplayPort connector without needing the DisplayPort to Dual-Link DVI adapter, as the BenQ monitors feature built-in DisplayPort 3D Vision technology.
HDMI and DVI adapters are widely available, if required.
Monitor Stands
At NVIDIA, we use Ergotech’s Triple LCD Desk Stand for 2D Surround and 3D Vision Surround setups, and their ‘1 over 3’ HD LCD Desk Stand for Surround setups utilizing the new Accessory Display.
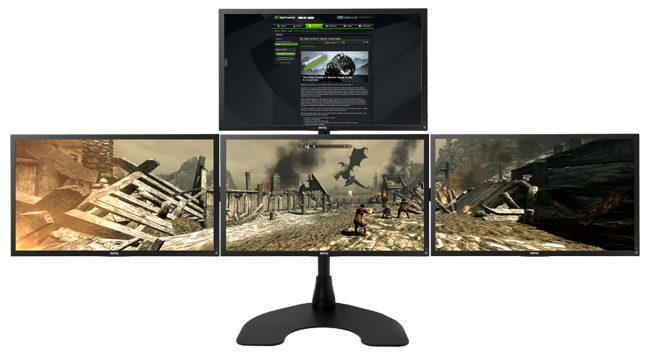
Other companies make similar stands, however, so make sure to shop around for the best possible deal.
Single-GPU Configurations
Note that this is an archived copy of the original article. Please see here for a more detailed explanation.
Single-GPU 2D Surround Gaming

Simple as can be: set up and enable the three 2D Surround displays using any combination of connectors, and then enable the Accessory Display using the final connector.
Single-GPU 3D Vision Surround Gaming
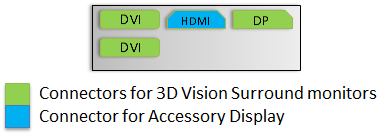
Connect the three 3D Vision Surround displays to the two DVI connectors and the single DisplayPort connector, ensuring the monitor connected to the DisplayPort is using a Dual-Link DVI adapter. Finally, connect the Accessory Display to the HDMI port.
2-Way SLI Configurations
Note that this is an archived copy of the original article. Please see here for a more detailed explanation.
2-Way SLI 2D Surround Gaming
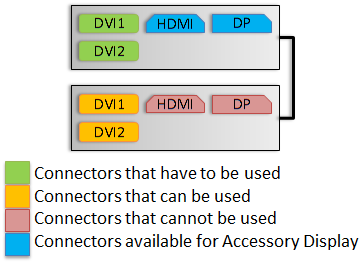
The recommend configuration is as follows:
- Connect two of the 2D Surround displays to DVI connectors one and two on the first graphics card, subsequently flagged as the Master.
- On the second graphics card, the slave, connect the third 2D Surround display to the first DVI connector.
- Connect the Accessory Display to the HDMI port or the DisplayPort on the Master graphics card.
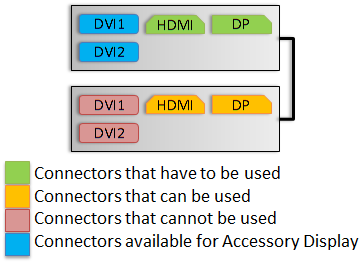
A further five configurations are possible if our recommendation is unfeasible. In each, the user personally decides which graphics card is to be defined as the Master.
Option 1:
- On the Master, connect one 2D Surround display to the first DVI connector, and the second to HDMI port.
- On the slave, the second graphics card, connect the final 2D Surround display to the first DVI connector, or the HDMI port.
- Connect the Accessory Display to the second DVI port or the DisplayPort on the Master graphics card.
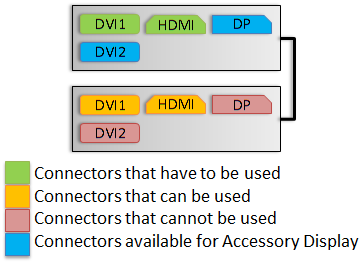
Option 2:
- On the Master, connect one 2D Surround display to the first DVI connector, and the second to the DisplayPort.
- On the slave, connect the final 2D Surround display to the first DVI connector or the DisplayPort.
- Connect the Accessory Display to the HDMI port or second DVI connector on the Master graphics card.
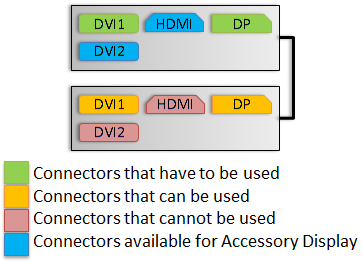
Option 3:
- On the Master, connect one 2D Surround display to the second DVI connector, and the second to the HDMI port.
- On the slave, attach the final 2D Surround display to the second DVI connector, or the HDMI port.
- Connect the Accessory Display to the first DVI connector, or the DisplayPort on the Master graphics card.
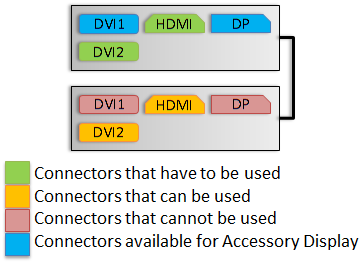
Option 4:
- On the Master, connect one 2D Surround display to the second DVI connector, and the second to the DisplayPort.
- On the slave, connect the final 2D Surround display to the second DVI connector, or the DisplayPort.
- Connect the Accessory Display to the first DVI connector, or the HDMI port on the Master graphics card.
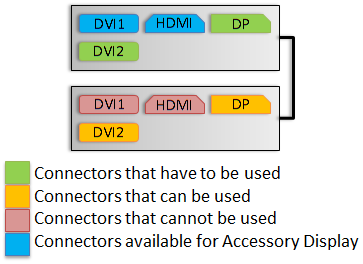
Option 5:
- On the Master, connect one 2D Surround display to the HDMI port, and the second to the DisplayPort.
- On the slave, connect the final 2D Surround display to the HDMI port, or the DisplayPort.
- Connect the Accessory Display to either DVI connector on the Master graphics card.
2-Way SLI 3D Vision Surround Gaming
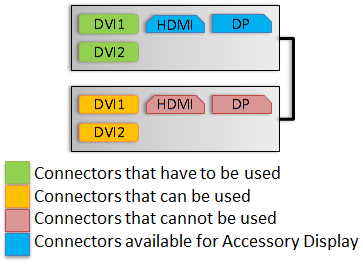
The recommend configuration is as follows:
- Connect two of the 3D Vision Surround displays to DVI connectors one and two on the first graphics card, subsequently flagged as the Master.
- On the second graphics card, the slave, connect the third 3D Vision Surround display to the first DVI connector.
- Connect the Accessory Display to the HDMI port or the DisplayPort on the Master graphics card.
A further three configurations are possible if our recommendation is unfeasible. In each, the user personally decides which graphics card is to be defined as the Master.
Option 1:
- On the Master, connect one 3D Vision Surround display to the second DVI connector, and the second to the DisplayPort.
- On the slave, connect the final 3D Vision Surround display to the second DVI connector or the DisplayPort.
- Connect the Accessory Display to the first DVI connector or the HDMI on the Master graphics card.

Option 2:
- On the Master, connect one 3D Vision Surround display to the first DVI connector, and the second to the DisplayPort.
- On the slave, connect the final 3D Vision Surround display to the first DVI connector, or the DisplayPort.
- Connect the Accessory Display to the second DVI connector or the HDMI port on the Master graphics card.

3-Way SLI Configurations
Note that this is an archived copy of the original article. Please see here for a more detailed explanation.
3-Way SLI 2D Surround Gaming
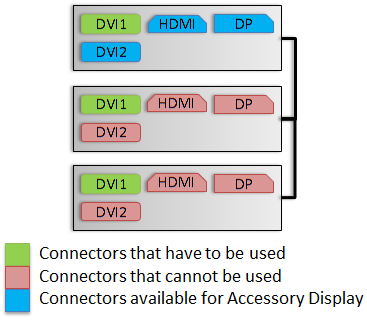
The recommend configuration is as follows:
- Connect the left 2D Surround display to the graphics card at the middle of the PC chassis, using the first DVI connector.
- Connect the central 2D Surround display to the top graphics card, again using the first DVI connector.
- Connect the right 2D Surround display to the bottom graphics card, again using the first DVI connector.
- Launch Windows, and in the NVIDIA Control Panel configure Surround, defining the center display as being connected to the top graphics card in the PC chassis. This sets it as the Master.
- Connect the Accessory Display to the second DVI connector, HDMI port, or DisplayPort on the Master graphics card.
- Alternatively, use the second DVI connector, HDMI port or DisplayPort on each graphics card for the 2D Surround displays, and the first DVI connector, HDMI port, or DisplayPort on the Master graphics card when powering the Accessory Display.
As the Master graphics card experiences the most load, our configuration defines it as the top-most card in the chassis. This card’s fan and cooler have the greatest amount of free space in the chassis, resulting in greater air flow, which leads to lower temperatures and slower, quieter fan speeds.
A further two configurations are possible if our recommendation is unfeasible. In each, the user personally decides which graphics card is to be defined as the Master.
Option 1:
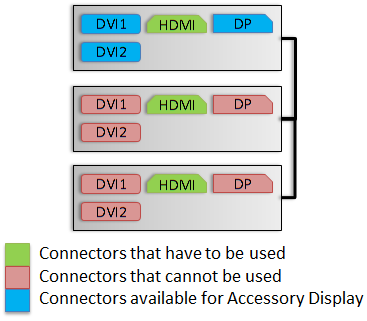
- On the Master graphics card, connect the central 2D Surround display to the HDMI port.
- On the second graphics card, connect the second 2D Surround display to the HDMI port.
- On the third graphics card, connect the final 2D Surround display to the HDMI port.
- Connect the Accessory Display to either DVI connector on the Master graphics card, or the DisplayPort.
Option 2:
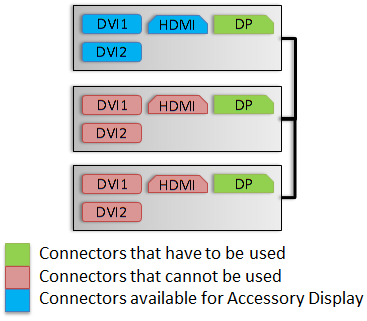
- On the Master graphics, connect the central 2D Surround display to the DisplayPort.
- On the second graphics card, connect the second 2D Surround display to the DisplayPort.
- On the third graphics card, connect the final 2D Surround display to the DisplayPort.
- Connect the Accessory Display to either DVI connector on the Master graphics card, or the HDMI port.
3-Way SLI 3D Vision Surround Gaming
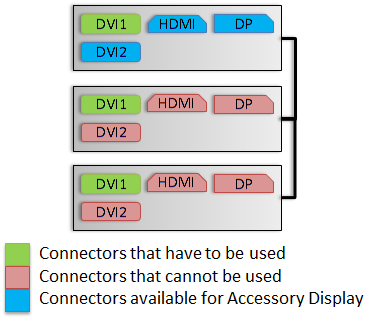
The recommend configuration is as follows:
- Connect the left 3D Vision Surround display to the graphics card at the middle of the PC chassis, using the first DVI connector.
- Connect the central 3D Vision Surround display to the top graphics card, again using the first DVI connector.
- Connect the right 3D Vision Surround display to the bottom graphics card, again using the first DVI connector.
- Launch Windows, and in the NVIDIA Control Panel configure Surround, defining the center display as being connected to the top graphics card in the PC chassis. This sets it as the Master.
- Connect the Accessory Display to the second DVI connector, HDMI port, or DisplayPort on the Master graphics card.
- Alternatively, use the second DVI connector on each graphics card for the 3D Vision Surround displays, and the first DVI connector, HDMI port, or DisplayPort on the Master graphics card when powering the Accessory Display.
As the Master graphics card experiences the most load, our configuration defines it as the top-most card in the chassis. This card’s fan and cooler have the greatest amount of free space in the chassis, resulting in greater air flow, which leads to lower temperatures and slower, quieter fan speeds.
One final configuration is possible if our recommendation is unfeasible. As before, the user personally decides which graphics card is to be defined as the Master.
Alternative Option:
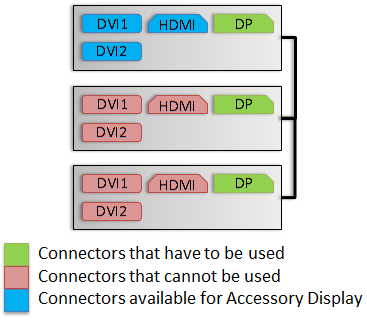
- On the Master graphics, connect the central 2D Surround display to the DisplayPort.
- On the second graphics card, connect the second 2D Surround display to the DisplayPort.
- On the third graphics card, connect the final 2D Surround display to the DisplayPort.
- Connect the Accessory Display to either DVI connector on the Master graphics card, or the HDMI port.
NVIDIA Control Panel Configuration
Note that this is an archived copy of the original article. Please see here for a more detailed explanation.
NVIDIA Control Panel Configuration
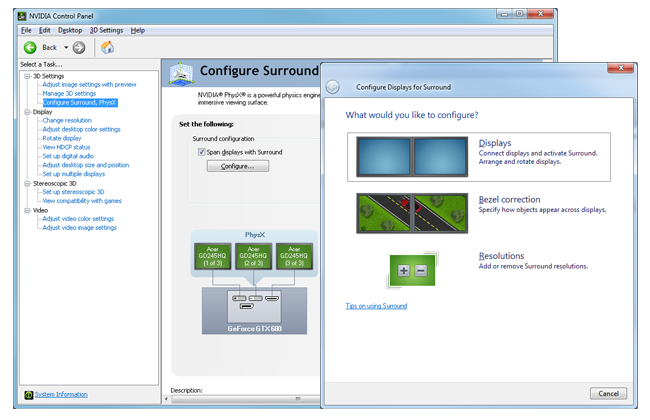
With monitors connected, start the PC, install the latest NVIDIA GeForce drivers, restart if needs be, and then open the NVIDIA Control Panel. Inside, navigate to ‘Configure Surround, PhysX’, and simply click the ‘Configure’ button that appears in the right-most window pane.
We hope this piece has been informative and instructive, but if any additional help is required please comment below or drop by the GeForce Forums.

 Previous


Comments
This comment section is currently disabled. Click here to enable comments and load all Disqus related resources
Please note that by enabling and loading these Disqus resources, you are agreeing to allow everything that comes with a Disqus comment section, including their cookies and all scripting.
This comment section is currently enabled. Click here to disable comments and unload all Disqus related resources
Please note that I have absolutely zero control over this comment section. It is still administered entirely by Nvidia themselves. I have no moderation power whatsoever and don't necessarily endorse any of the comments posted here. In fact, I don't believe this comment section adds much value to the article to begin with but included it only because it existed on the original.