This is an archive of the original TweakGuides website, with post-archival notes added in purple text. See here for more details.
The Gamer's Graphics & Display Settings Guide
[Page 3] The Graphics Process (Pt.2)
Step 4 - The Graphics Driver Translates the Data

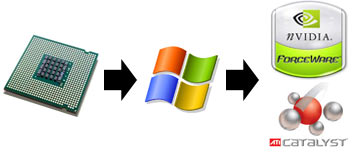
The Operating System helps coordinate the allocation of data by the CPU, by using a specific Graphics Driver to translate the CPU instructions into a format that's optimal for the graphics card you are using. If you don't have a specific graphics driver installed for your card, Windows has generic graphics drivers for most cards and will use this instead. While this generic driver allows your card to perform most graphics functions, it is not optimal at all, and certain advanced graphical effects may not be available to you.
Performance Tip: This is the reason why it is imperative to have the latest official driver for your particular graphics card 'cleanly' installed on your system - for more details see my ATI Catalyst Tweak Guide or Nvidia Forceware Tweak Guide. Many game problems are caused by bad driver installation and/or poor driver setup, and these problems can manifest themselves in many different ways, from crashes to graphical glitches to additional stuttering/hitching.
Step 5 - The Graphics Port Transfers the Data

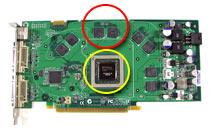
With a range of graphics-related data having been allocated by the CPU to the graphics card, the data is sent along the motherboard and out through the PCI, AGP or PCI-E port - the interface into which you've plugged your graphics card (circled in red above) - to your graphics card. The importance of the port type is that the higher the potential data transfer speed of the port, the quicker data can be transferred back and forward between the CPU and the graphics card. The old PCI standard transfers data at up to 133MB/s; AGP transfers it at 266MB/s (1x) up to 2,133MB/s (8x); and PCI-E being the current fastest interface transfers it at a maximum possible rate of 4,000MB/s (16x), up to 8,000MB/s (32x) for PCI-E 2.0, and even higher in the future. More details on specific transfer rates for a range of devices can be found here.
Remember that these are maximum possible transfer rates, not guaranteed transfer rates. Just like Internet bandwidth, simply having a fast broadband connection doesn't mean you will always get your maximum download speeds from every site. The transfer speeds shown are merely the highest potential rates allowed through these ports.
Performance Tip: More detailed games are more data-intensive, and this is why all recent graphics cards are now based solely on the PCI-E interface and AGP has been phased out. Only PCI-E guarantees that the increasing amount of data to be transferred back and forth between the CPU and graphics card will never be bottlenecked by the port itself. Make sure your BIOS and hardware configuration is set up to use the maximum possible rate on your PCI-E slot. You can check under the Mainboard tab of the free CPU-Z utility to check your currently utilized and maximum potential Graphics Interface speeds.
Step 6 - The VRAM Stores the Data

The data entering the graphics card is now stored on the card's own local memory, called Video RAM (VRAM), just two chips of which are circled in red above. These onboard VRAM chips provide a similar service to that of regular system RAM on your motherboard, as a temporary storage area designed to help speed up calculations by the Graphics Processing Unit (GPU) - circled in yellow above. Basically as you can see, your graphics card is almost like a miniature PC within itself, with its own CPU (GPU), RAM (VRAM) and motherboard (PCB), and operates in much the same way. VRAM not only serves as a storage point for data to be calculated for rendering, it also holds completed images (frames) ready for sending to your monitor - see Step 8 for details.
This is the reason why the amount of VRAM is increasingly becoming larger and more important on modern graphics cards. The more information that can be held onboard the graphics card's VRAM, the more quickly the GPU can process data and not have to pause to allow more data to be loaded up into VRAM. For example, games with high resolution textures require more VRAM space. When space runs out in VRAM, existing unused textures have to be switched out and new ones loaded up from your drive and/or system RAM into the VRAM. The slight pause which results from this process is commonly referred to as hitching (when data is switched into/out of VRAM) or stuttering (when data loads up from the drive first), and is most noticeable when you enter new areas or see new objects during a game. Your graphics card literally pauses to wait for new data to be loaded for display before continuing.
Performance Tip: This step highlights the importance of having more VRAM on your graphics card. If running a game on a card with less VRAM, you must lower your texture settings and/or resolution, otherwise you will get more hitching/stuttering as data is constantly swapped into and out of the VRAM. This is particularly true if you have a slow hard drive and less system RAM as well. Cooling the VRAM properly is also essential, as almost all cases of noticeable graphical glitches (also called 'Artifacts'), and many crashes and lockups, are due to overheating VRAM. Remember that the temperature sensor on your graphics card is not located on the VRAM - it is on or close to the GPU; so your VRAM can often run much hotter. Use the free GPU-Z utility to monitor your temperatures and research online to determine what temperature is excessive for your particular model of graphics card.
|
|
This work is licensed under a Creative Commons Attribution 4.0 International License.


