
Far Cry 3 Tweak Guide
[Page 15] Adv. Tweaking Part 4
Far Cry 3 has two built-in Anti-Aliasing methods, namely MSAA and FXAA, but this may not be sufficient for your needs. Indeed, if you run in DirectX 9 mode, MSAA won't be available to you, because it is incompatible with the type of deferred rendering implemented in DX9. So there is every reason to try out other methods of smoothing jagged lines. These are covered below:
SMAA
One method of AA readily available to those playing Far Cry 3 in DirectX 9 mode is Subpixel Morphological Anti-Aliasing (SMAA). This can be applied using the free InjectSMAA utility. SMAA allows for slightly better results than the FXAA in Far Cry 3, and without any blurring.
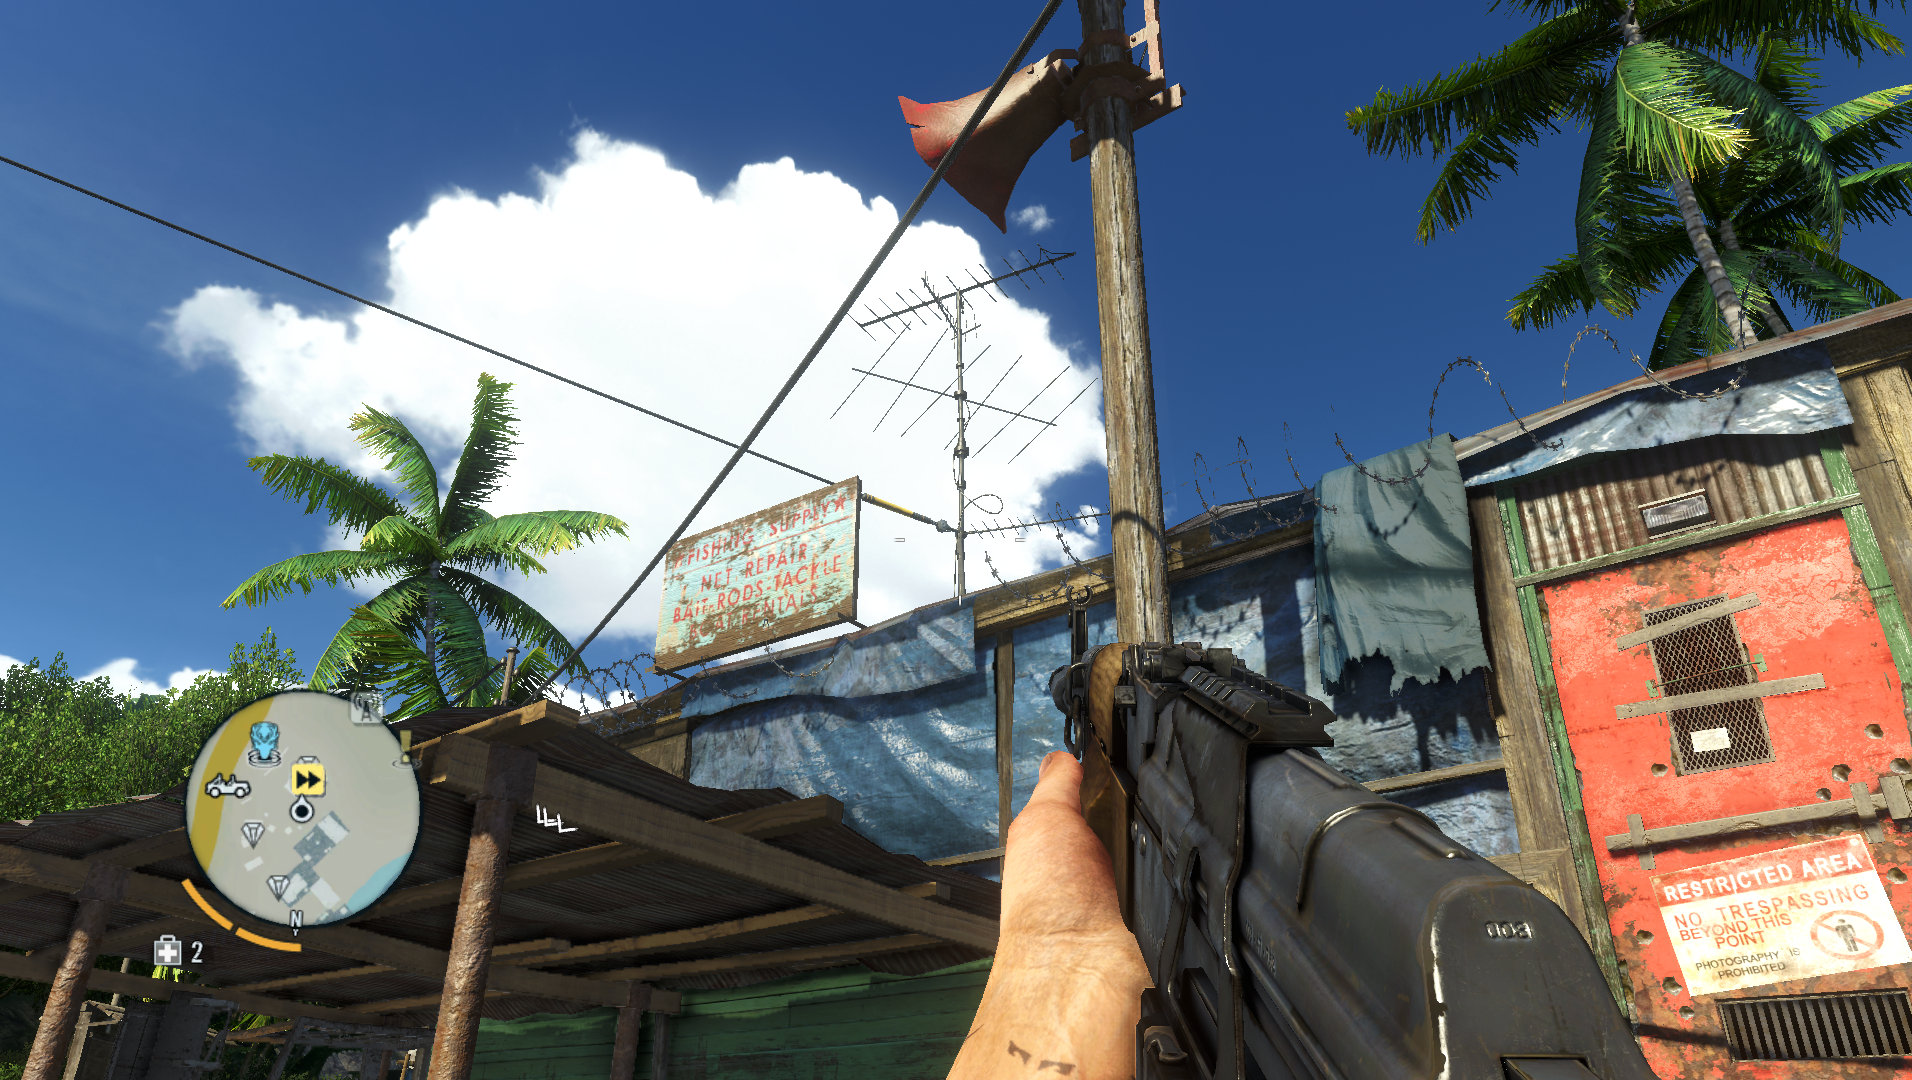
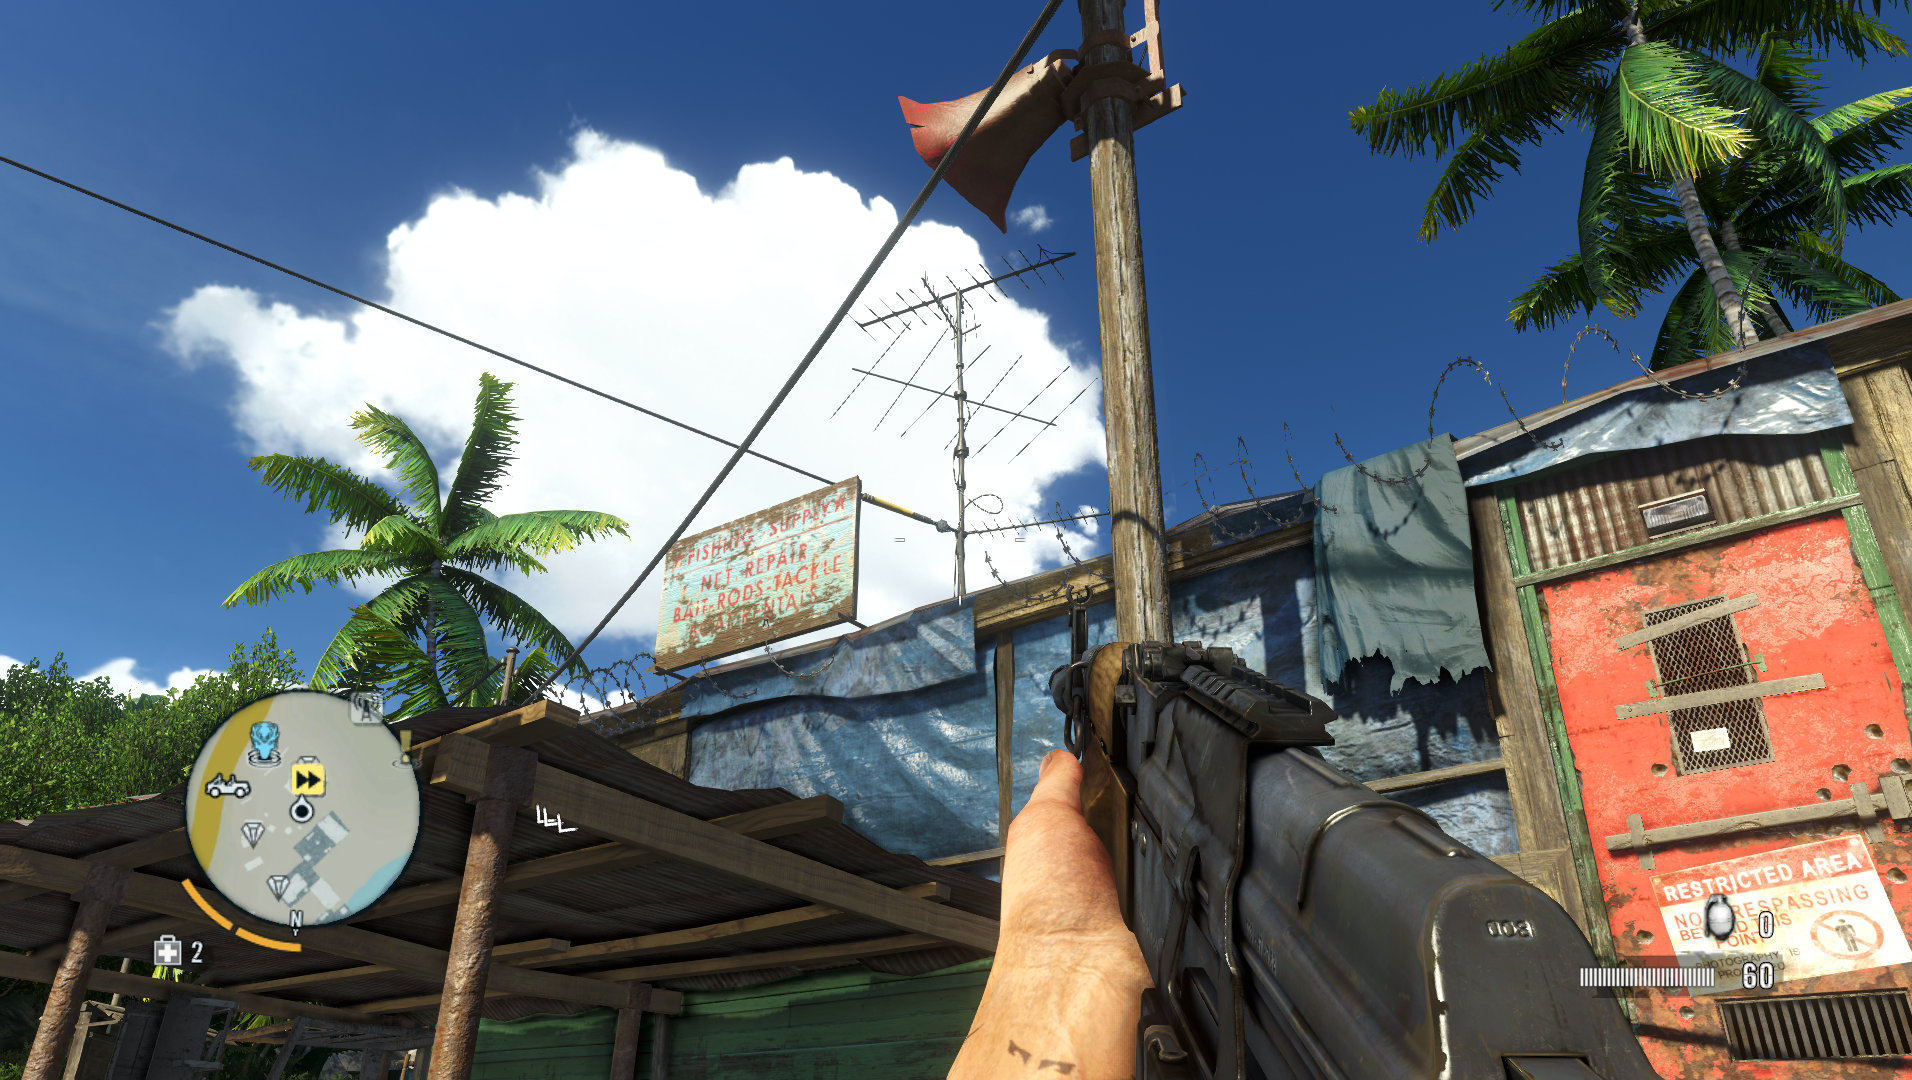

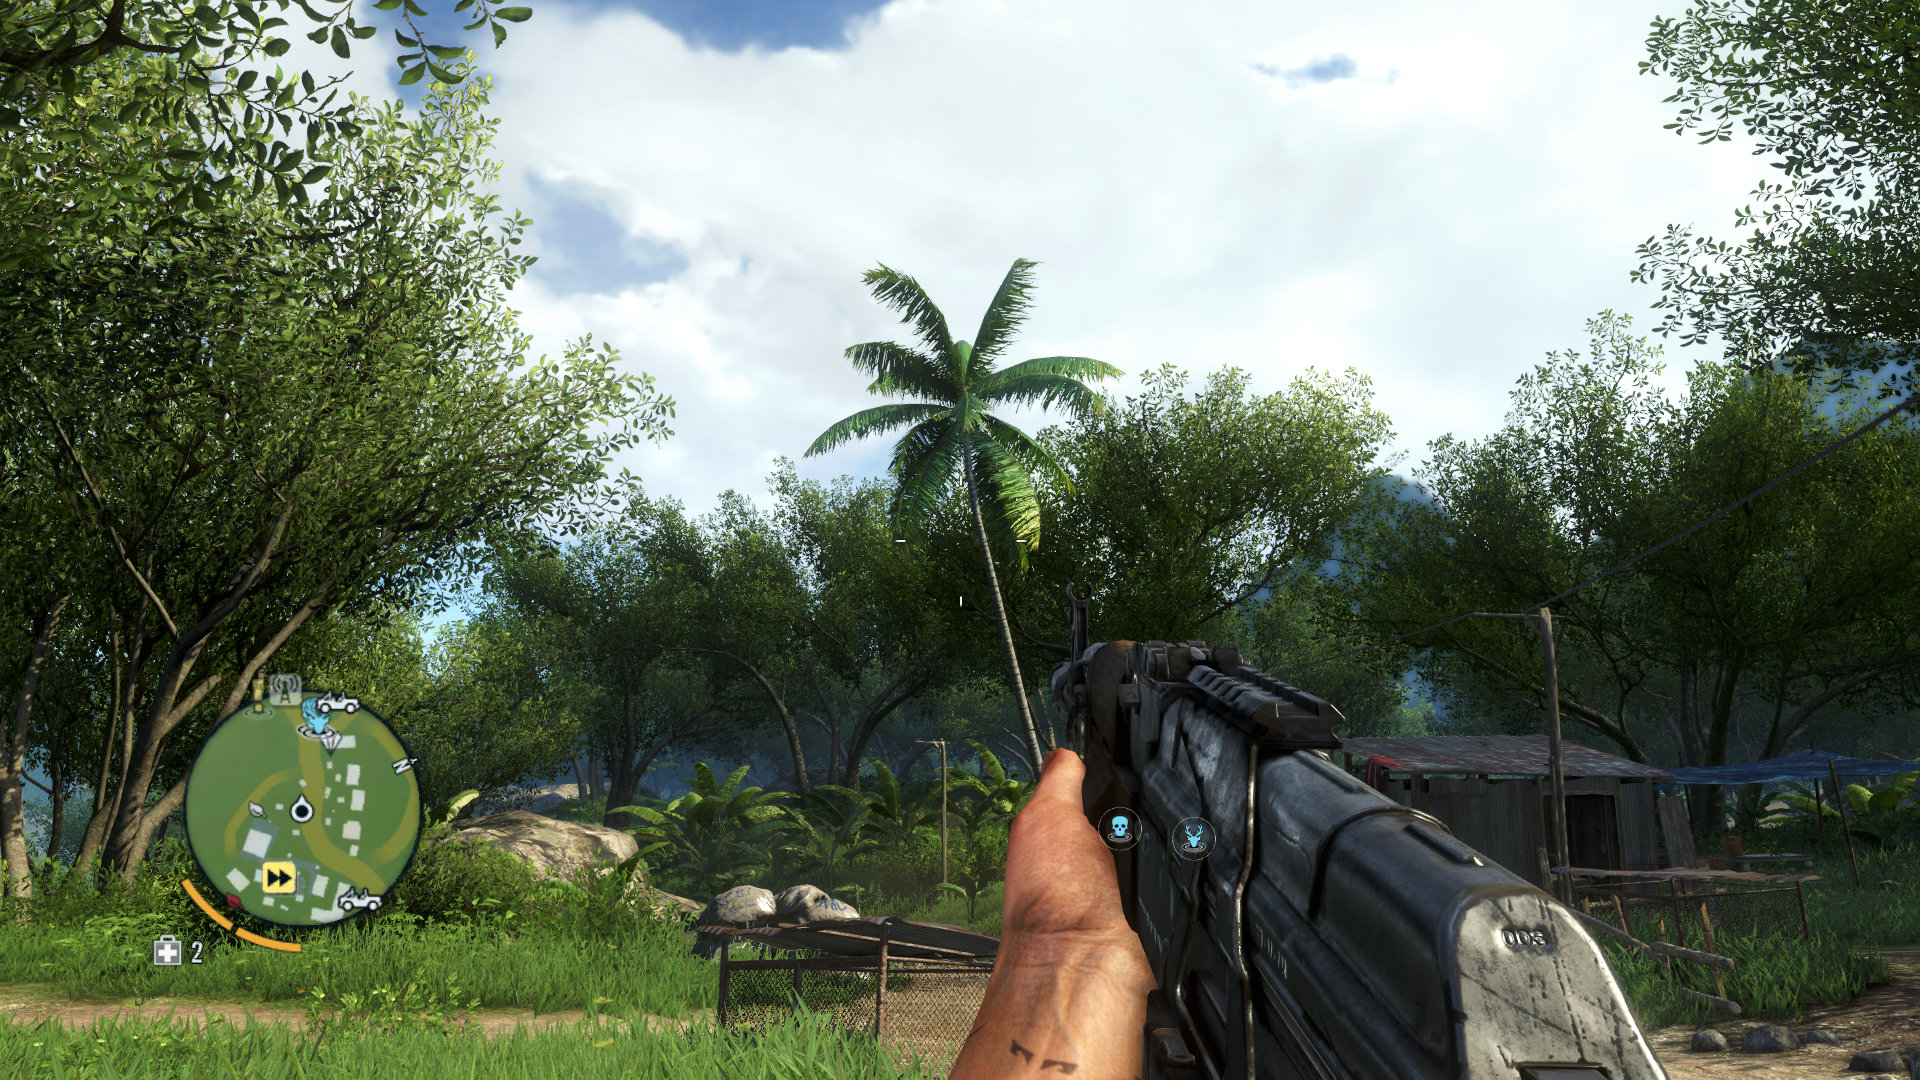
The screenshots above show the scene firstly with no AA whatsoever, and that includes disabling the in-game FXAA by setting Post FX to Low. As you can see, the palm trees, the right side of the sign, and the antenna are all exhibiting some jaggedness. Next, in-game FXAA is applied by changing Post FX to Ultra, which uses the highest quality of FXAA available in Far Cry 3. The jagged edges are smoothed, but not enough to smooth out the antenna. Then SMAA is applied in place of FXAA, and there is a bit more smoothing, visible mainly on the antenna. In practice SMAA does not actually smooth out jaggedness as much as these screenshots may imply, because in motion during the game, you will still see some jagged edges and shimmering. However it is an improvement over FXAA, and comes at very little cost in performance.
Note: SMAA appears to be problematic when applied to Far Cry 3 in DirectX 11 mode. You can get it the game to launch with SMAA by clicking on the arrow next to the Play button in UPlay and selecting 'Launch in Safe Mode', which only disables UPlay while within the game. However, upon entering the game, you will only see a black screen when SMAA is enabled. As such, SMAA is best used by those running in DirectX 9 mode.
To implement SMAA, follow these instructions:
- Download the InjectSMAA utility.
- Extract the files from the downloaded archive. For Far Cry 3 in DirectX 9 mode we're after the contents of the d3d9 folder of InjectSMAA.
- Move the files under this folder into the base directory of Far Cry 3. Typically this is the \Program Files (x86)\Far Cry 3\bin directory, or \Program Files (x86)\Steam\steamapps\common\Far Cry 3\bin for the Steam version. Basically it's the same directory in which the farcry3.exe file resides.
- Launch the game as normal and SMAA will automatically be in effect.
- It is recommended that you disable the in-game FXAA option to prevent blurring and conflicts. You can do this by either setting Post FX to Low, or using the FXAALevel="0" command as covered in the Advanced Tweaking Part 2 section.
- To toggle SMAA off/on at any time, use the PAUSE key.
- To remove SMAA completely, delete the files you moved into the base directory of Far Cry 3. Typically these are d3d9.dll, injector.ini, SMAA.fx and SMAA.h.
SSAA
Super-Sample Anti-Aliasing (SSAA) is a relatively performance intensive form of anti-aliasing, but is useful for those who demand a higher quality of smoothness for transparent textures. It can be enabled in both DirectX 9 and DirectX 11 modes in Far Cry 3.

Click here for an interactive comparison between 4x MSAA with Enhanced Alpha To Coverage, and 4x MSAA with SGSSAA.
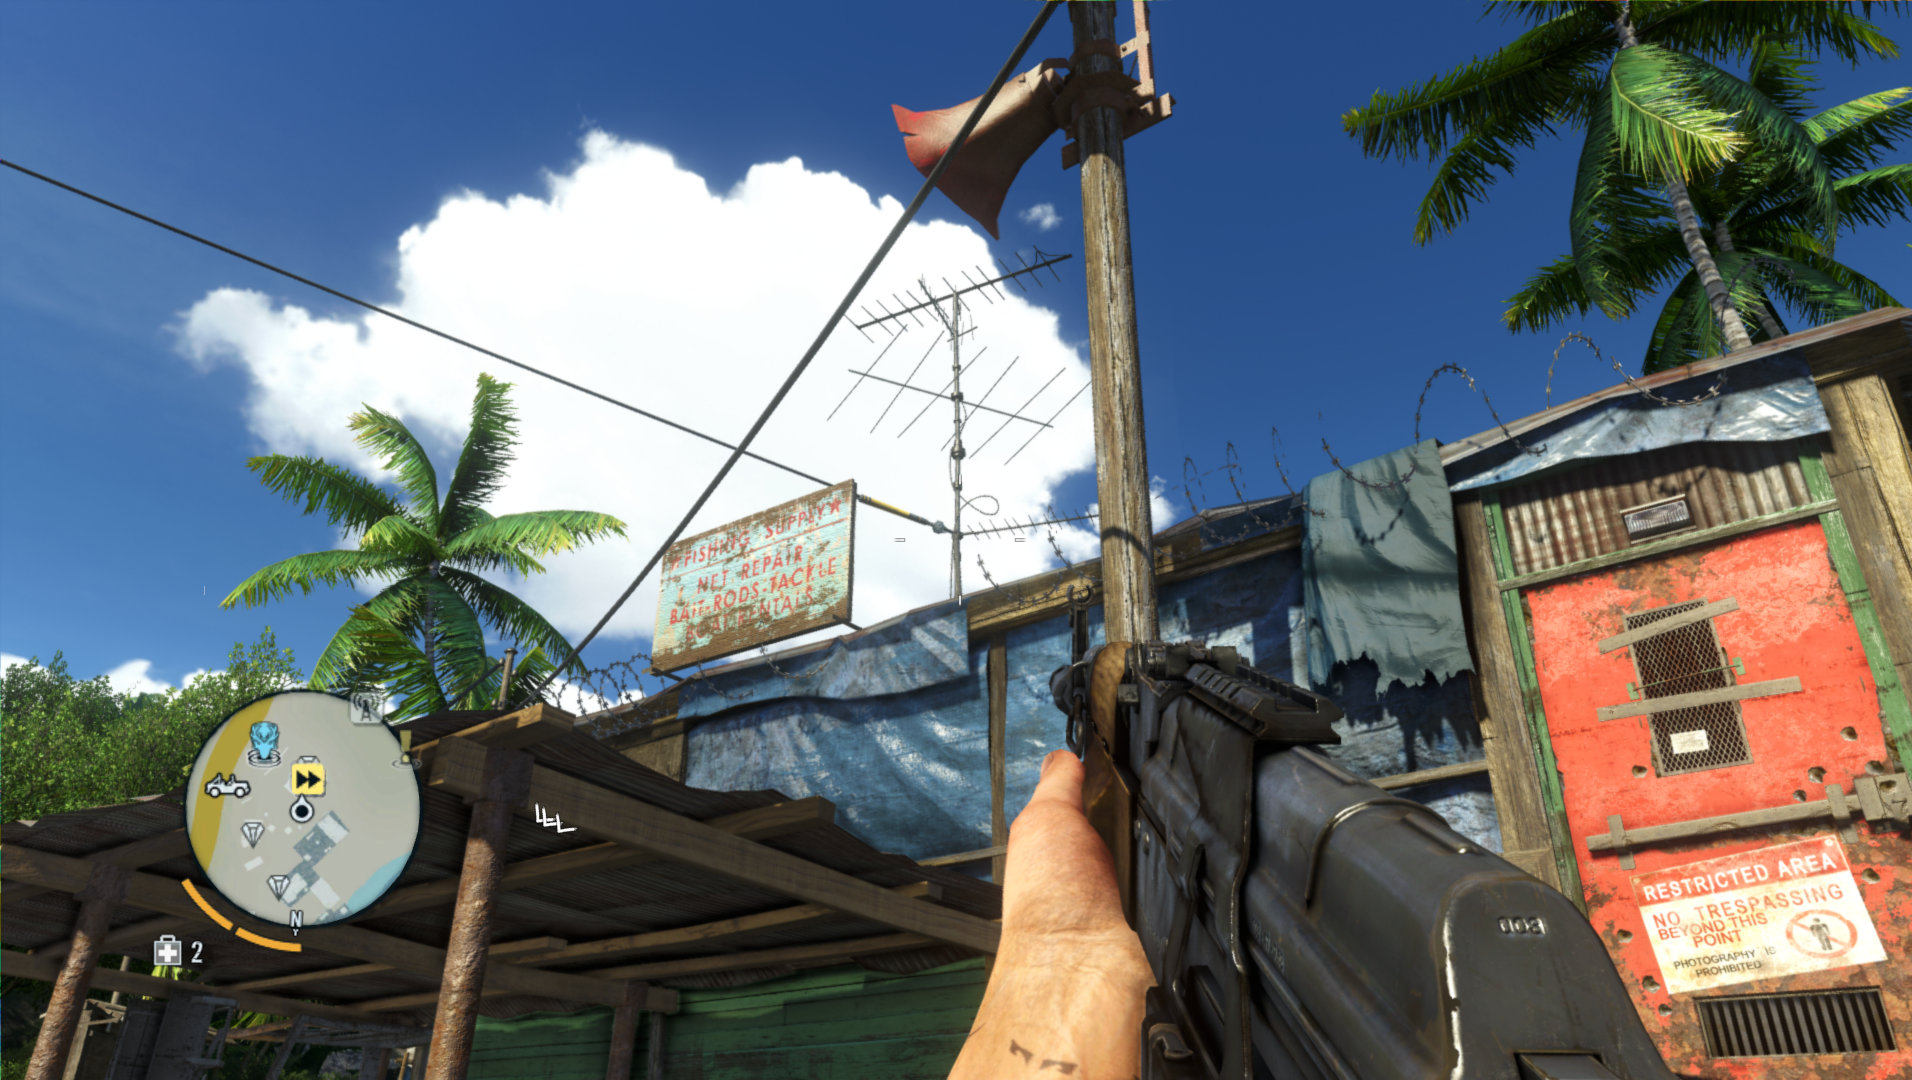
The screenshot comparison above shows a scene firstly with no form of AA enabled except for the built-in FXAA. Then we switch on 4x MSAA and set the built-in transparency AA solution Alpha To Coverage to its maximum of Enhanced. As you can see, it cleans up the jagged edges of foliage, but leaves things a little blurred, losing some fine detail. Next, we use 4x MSAA but instead combine it with 4x Sparse Grid Supersampling (SGSSAA) - the result is similar, but more detailed. But to really detect the quality difference between these methods, look at the mesh fence at the bottom center, just to the left of the hand. With Alpha To Coverage Enhanced, it still looks blocky, while with SGSSAA, it looks much cleaner, and more defined.
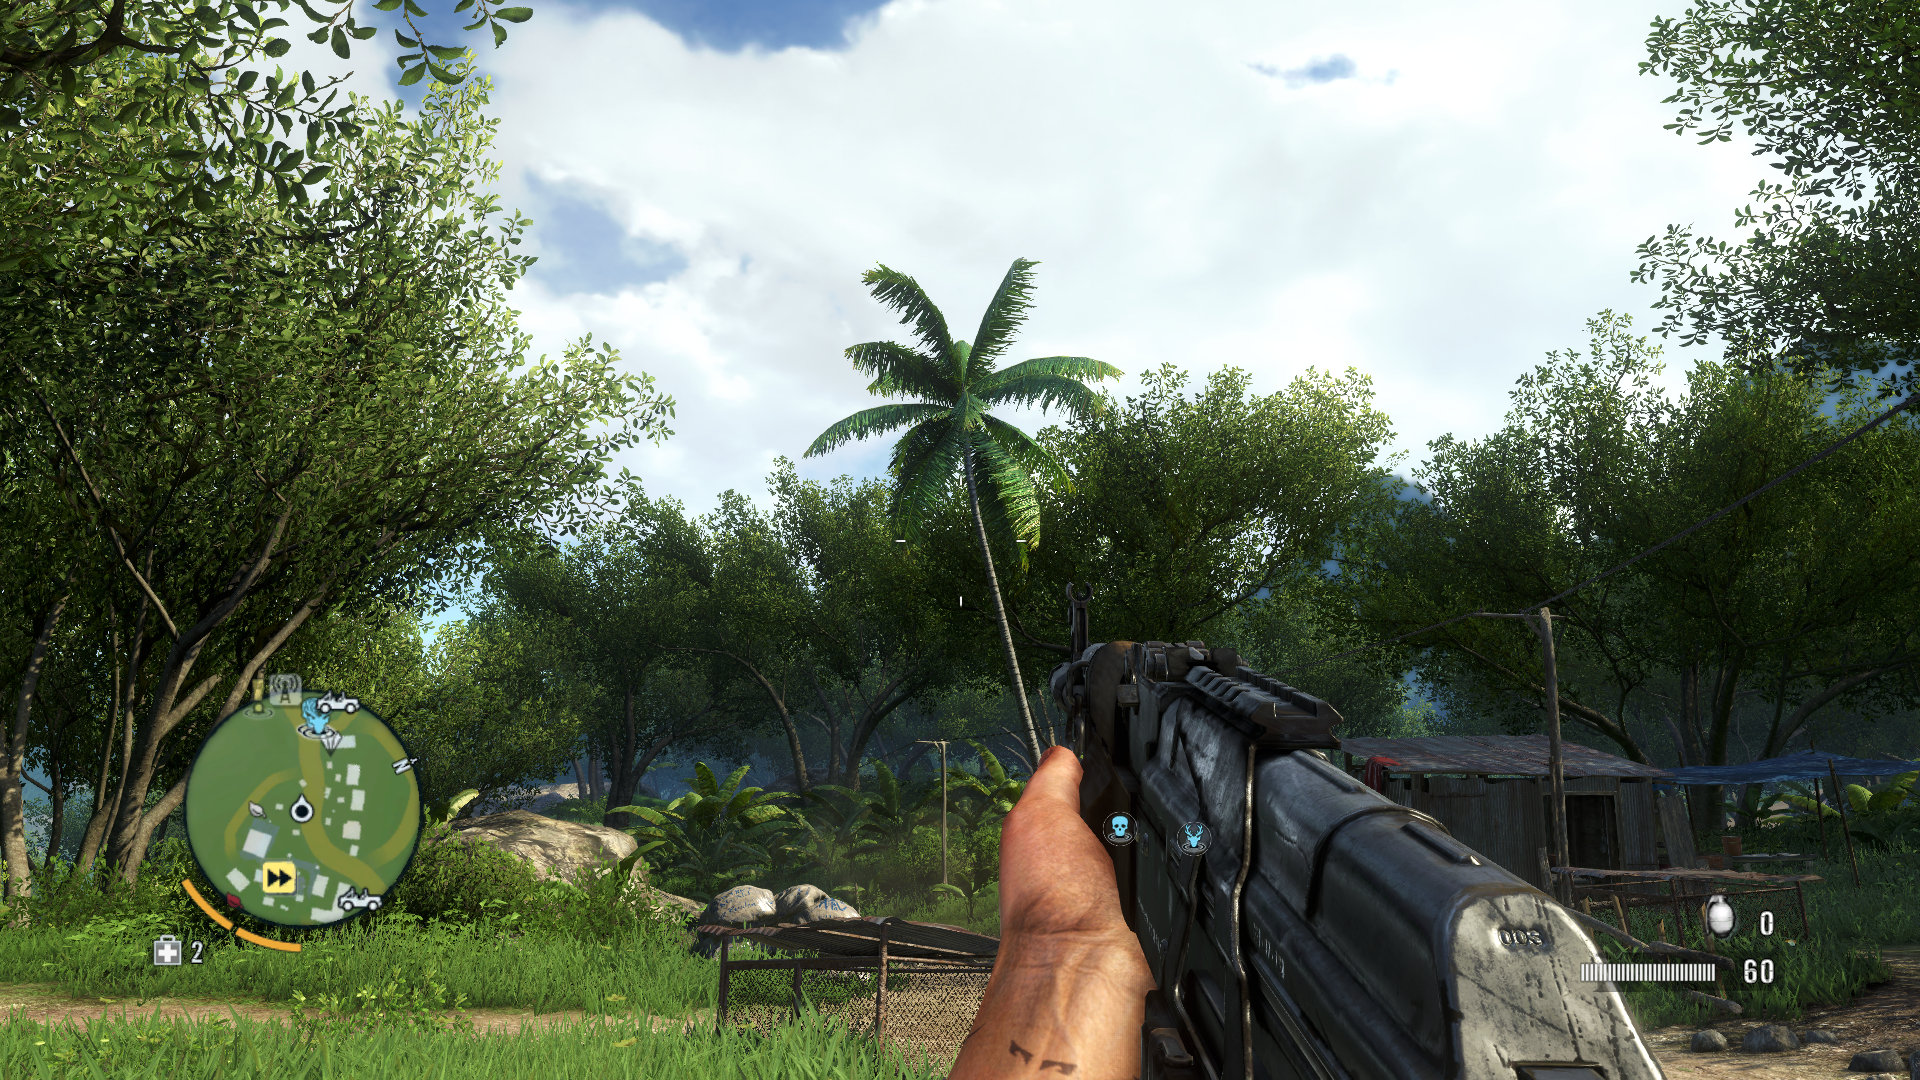
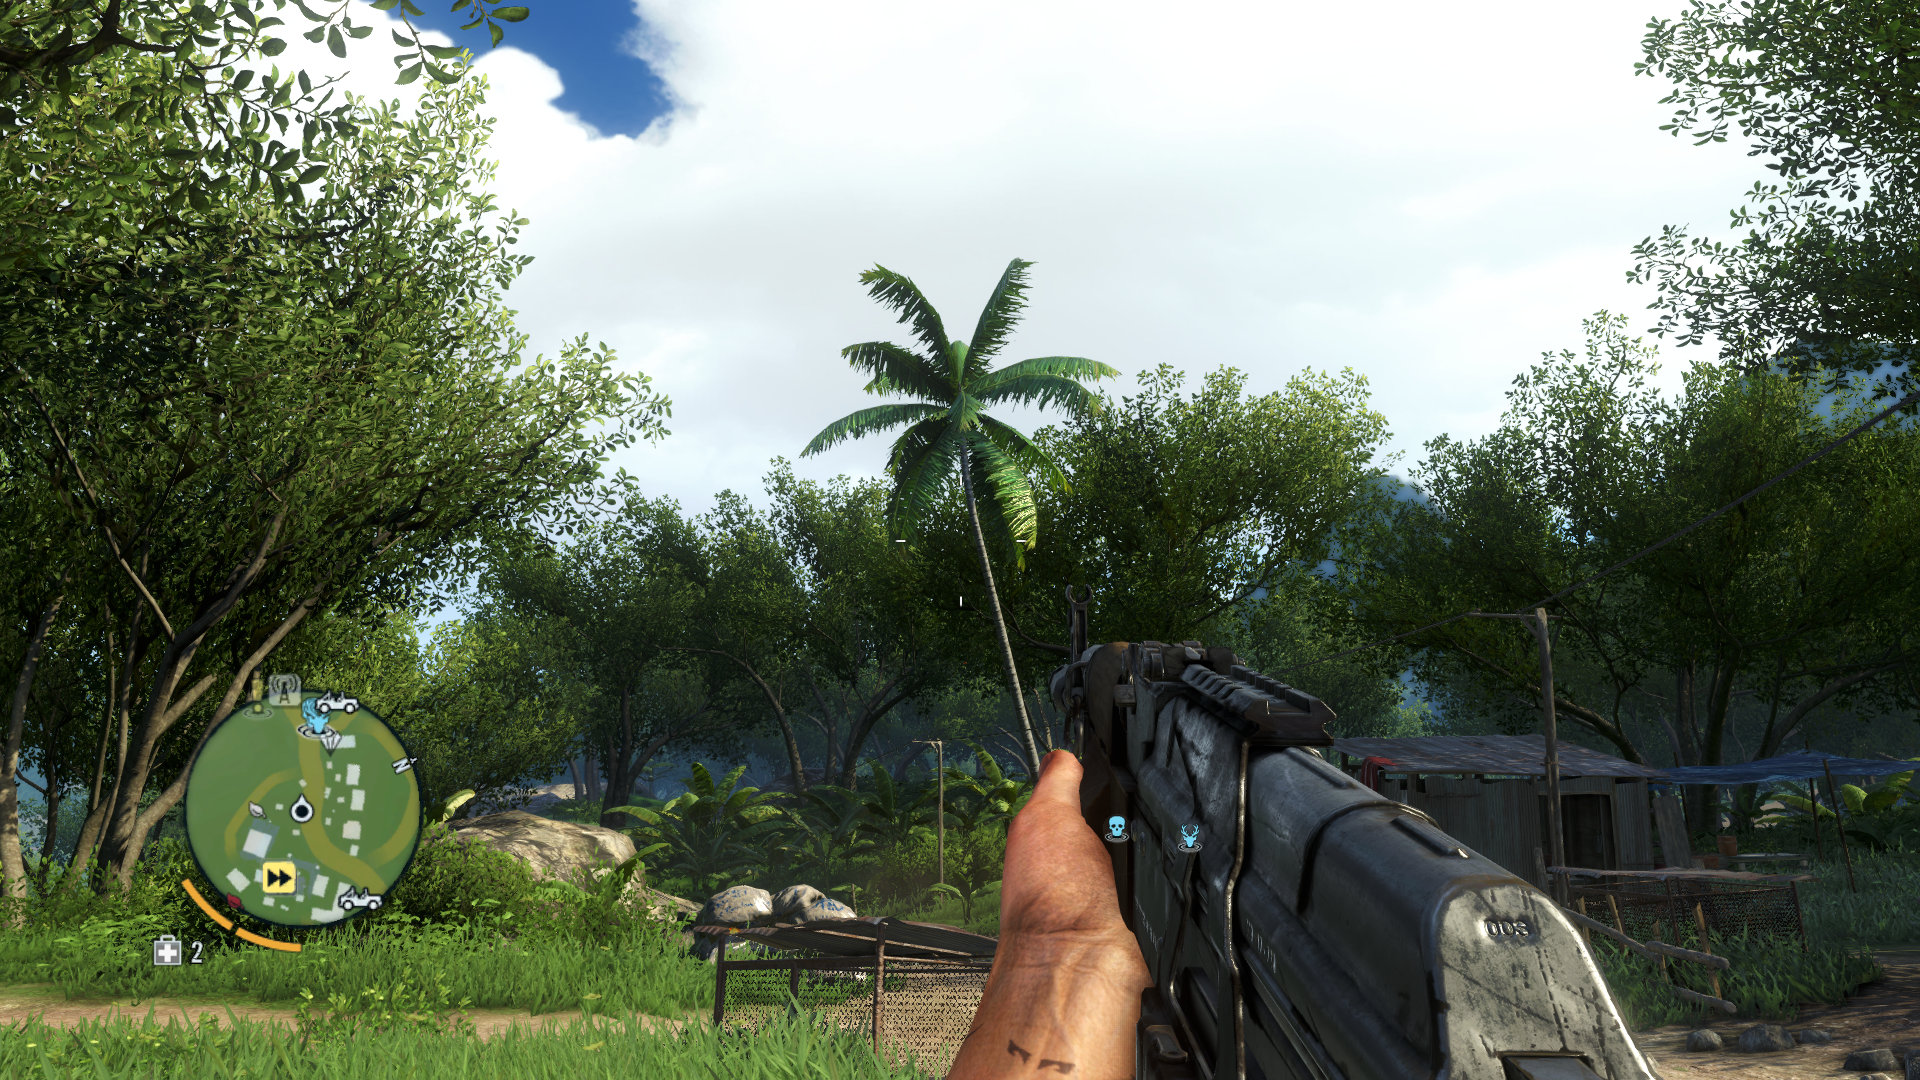
The second set of screenshots demonstrates the use of 4x SGSSAA in DirectX 9 mode. As you can see, it can smooth out all jagged lines, but it will also have a dramatic performance impact.
The only problem with SGSSAA is that it has a much steeper performance hit than Alpha To Coverage, so it should only be used by those with very fast systems who want cleaner transparency anti-aliasing, or those running in DirectX 9 mode; otherwise the built-in Alpha To Coverage method is usually sufficient.
You can implement Sparse Grid Supersampling by using the free NVIDIA Inspector utility. Follow the steps below:
- Download and install NVIDIA Inspector. Importantly, make absolutely certain that you have also updated your graphics drivers to the latest version, as NVIDIA Inspector requires the most recent game profiles from the latest drivers.
- Launch NVIDIA Inspector and click the small Driver Profile Settings button (the crossed wrench and screwdriver icon) next to the Driver Version box.
- In the window which opens, click the Profiles drop-down box and select 'Far Cry 3'. If the profile isn't there, see Step 1.
- For DirectX 9 mode, you will need to set 'Antialiasing compatibility' to 0x004012C1.
- For DirectX 9 mode, you will need to set 'Antialiasing - Mode' to 'Override any application setting'.
- For DirectX 9 mode, you will need to set 'Antialiasing - Setting' to a level of Multisampling to match the level of Supersampling you will select in step 8. E.g. select '4x Multisampling' in this example.
- For DirectX 11 mode, the 'Antialiasing - Mode' should be set to 'Enhance the application setting'.
- For either mode, for 'Antialiasing - Transparency Supersampling', select an option. In our example, we will use '4x Sparse Grid Supersampling' (4x SGSSAA).
- Click the 'Apply changes' button at the top right to save your settings. You can close NVIDIA Inspector if you wish as it doesn't need to be active for your settings to work.
- Launch the game as normal, and in DirectX 11 mode, also set the in-game MSAA Anti-Aliasing option to an MSAA level matching the SGSSAA level that you have applied. E.g., set in-game MSAA Anti-Aliasing to 4x MSAA if using 4x SGSSAA.
To undo these changes at any time, click the small green NVIDIA logo button at the top of the profiles screen in NVIDIA Inspector, and the Far Cry 3 profile will be returned to its default settings.
Graphics Modifications
The SweetFX Shader Suite allows you to apply a range of post-process changes to Far Cry 3, altering its appearance to better suit your tastes. It includes SMAA anti-aliasing capabilities, but more importantly, it allows changes to other aspects of the game's visuals, like color saturation, lighting effects, and sharpening. To install SweetFX, download the package and extract its contents to the base directory of Far Cry 3. Typically this is the \Program Files (x86)\Far Cry 3\bin directory, or \Program Files (x86)\Steam\steamapps\common\Far Cry 3\bin for the Steam version.
Once Far Cry 3 is launched, you can toggle SweetFX effects on or off using the SCROLL LOCK key by default. To adjust the effects, you must edit the SweetFX_settings.txt file that you placed in your Far Cry 3 directory. You can edit the settings text file while the game is running, save your changes and press the PAUSE key to update the screen with the new effects, making testing much easier.
Unfortunately, since SweetFX is based on the InjectSMAA tool, it too has a problem running in DirectX 11 mode in Far Cry 3. Even if you disable the UPlay overlay so you can launch the game with SweetFX, it will usually result in a black screen when SweetFX effects are enabled in the game. This means SweetFX is limited to DirectX 9 mode users.
SweetFX is highly configurable, and the instructions are too lengthy to be covered here. Refer to the download page linked above for a full rundown.


The screenshots above demonstrate the difference between the standard in-game image, and one that has been noticeably altered using SweetFX. The SweetFX-ified image has much greater color saturation, sharpness and dynamic range. This is not to suggest that it looks "better", especially as I've deliberately altered it to exaggerate the effect somewhat and make the difference stand out more. In reality the degree to which you modify the graphics using SweetFX is entirely up to your personal tastes; what looks good to one person might look overly garish and intolerable to another.
One last type of modification can be tried, and that is directly altering the game's files. The main use for this type of modding at the moment is for disabling aspects of the Far Cry 3 Heads Up Display (HUD) that some players consider distracting. Instructions and tools are provided here, but be aware that this is only for advanced users.
|
|
|
|
![]()


This work is licensed under a Creative Commons Attribution 4.0 International License.