
Far Cry 3 Tweak Guide
[Page 13] Adv. Tweaking Part 2
On the previous page, we looked at editing or adding commands to existing sections of GamerProfile.xml. Now we examine settings that need to be added in their own newly created custom sections, and can't just be slotted in to an existing section of GamerProfile.xml. We'll go through an example below to see how this is done correctly.
Post FX
GameDepthOfField="0"
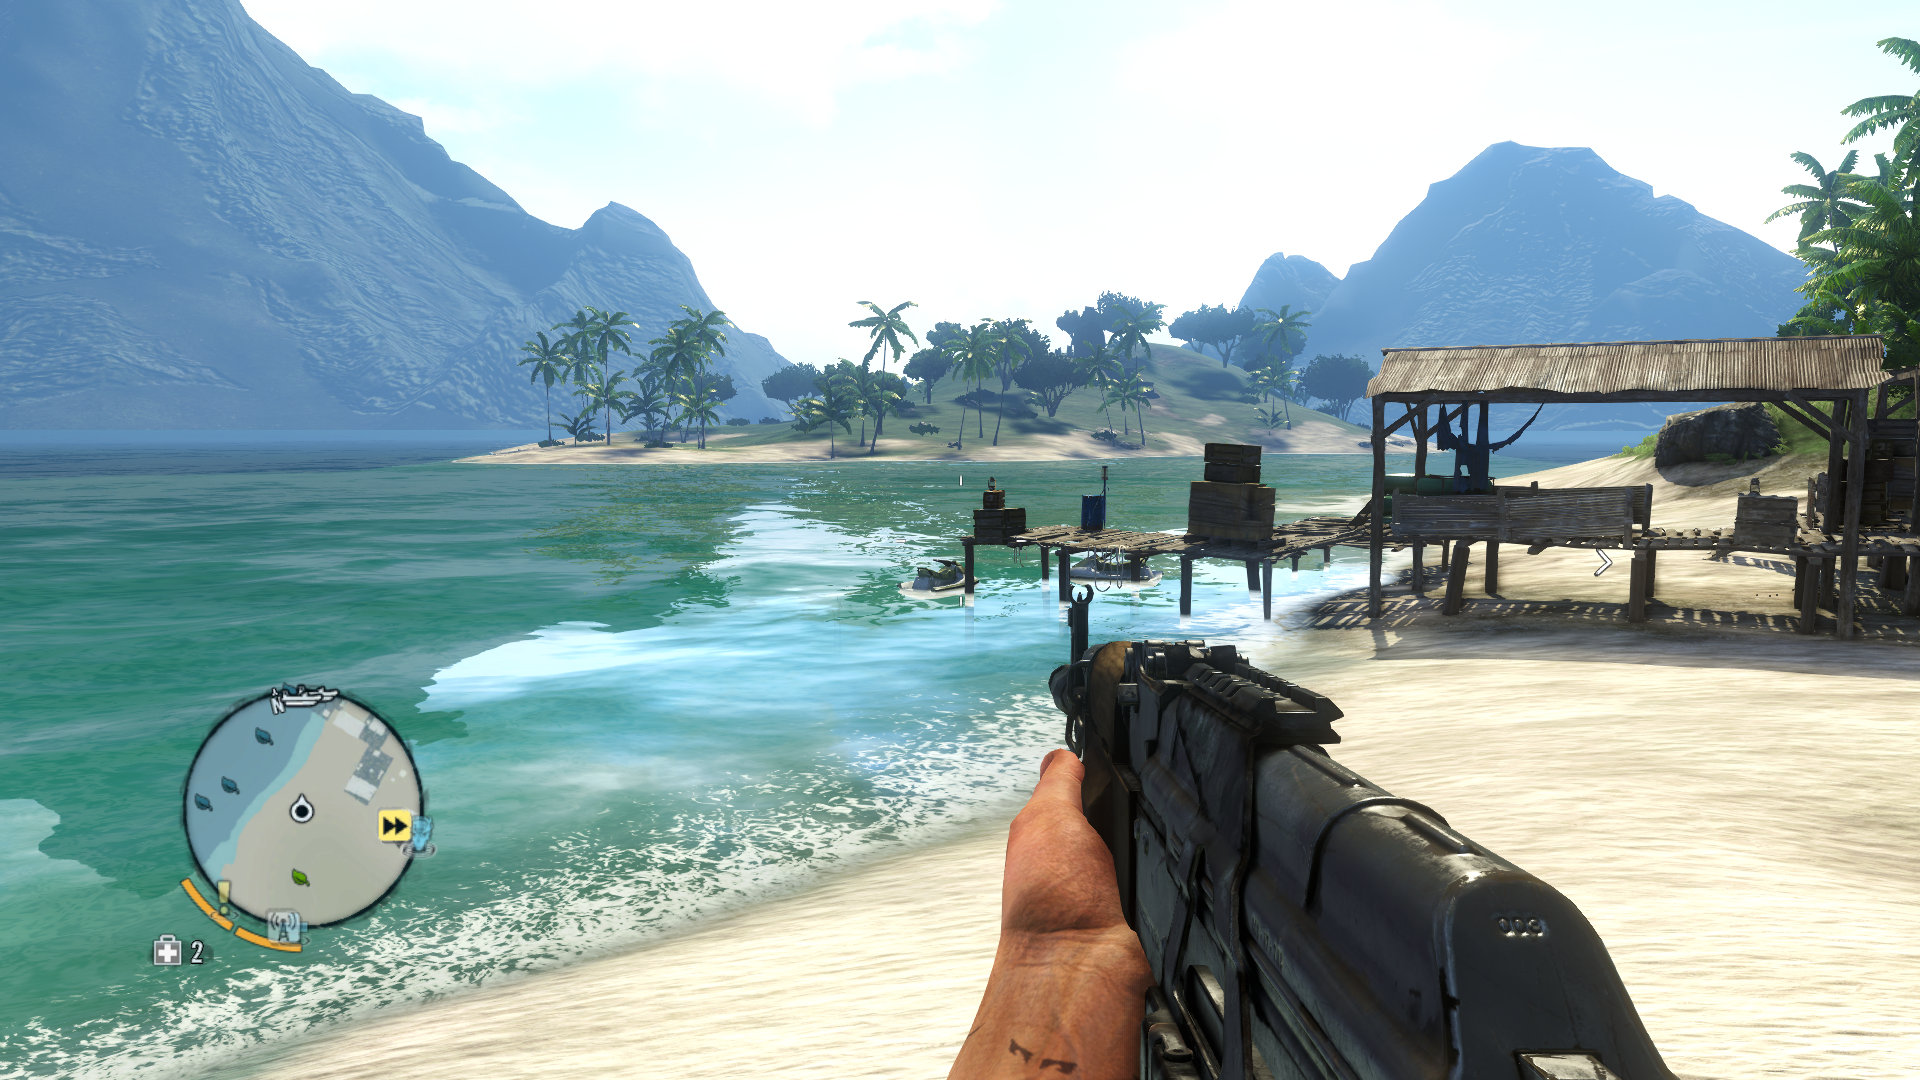
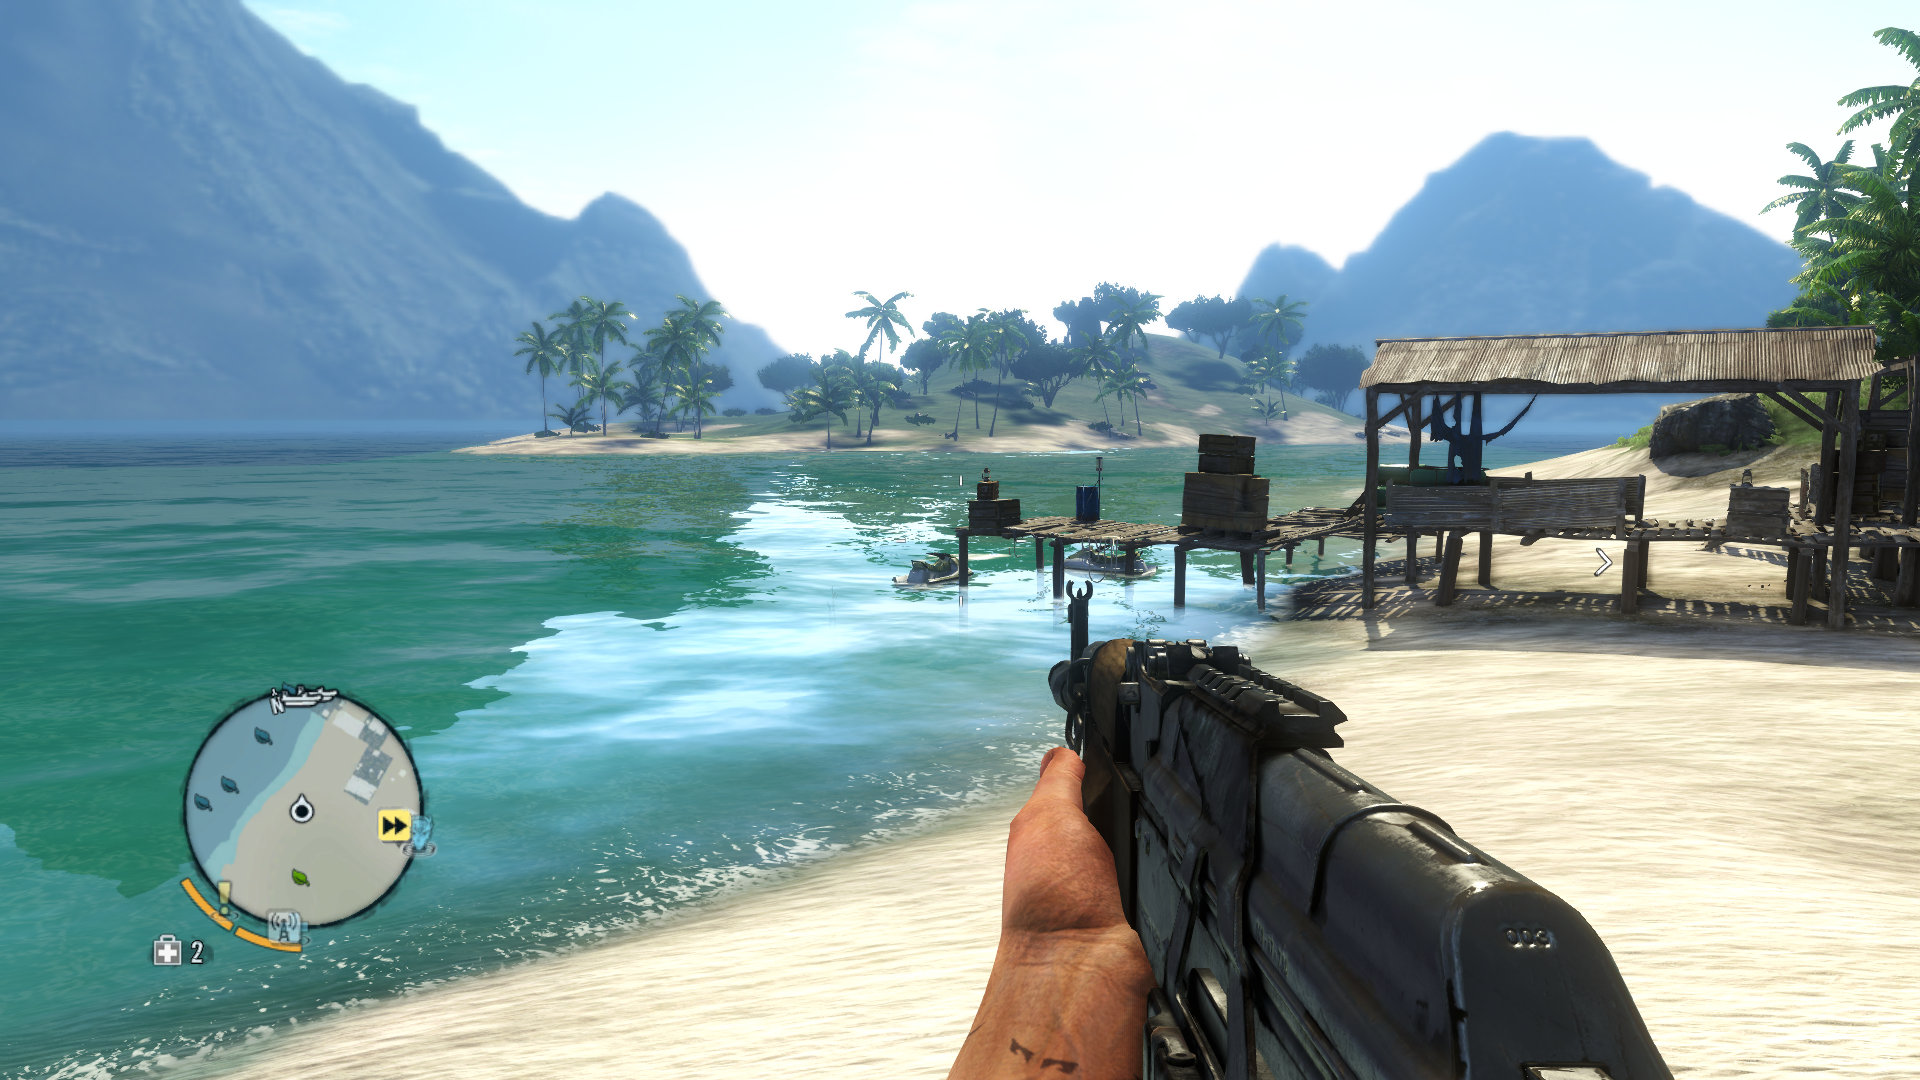
The command above, if implemented correctly and set to ="0", will turn off the main Depth of Field (DoF) effect in the game. DoF in Far Cry 3 makes distant areas look hazy, and normally can't be disabled within the game, even on the lowest Post FX setting. The screenshots above demonstrate the difference when DoF is disabled, most obviously when you look at the mountains in the distance. Disabling DoF can make the game world clearer and distant details sharper, but it can also make the distant object fade-in/fade-out more noticeable. It is largely a matter of taste as to whether you disable this effect or not.
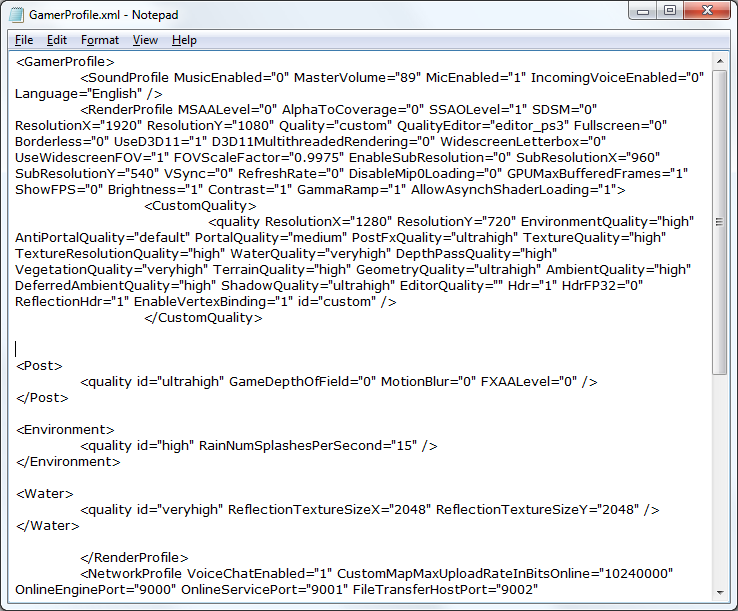
To make this command work properly, you first need to create a custom section for it. Open GamerProfile.xml, and find the </CustomQuality> tag, then go to the end of it, and press Enter several times to create some blank space between it and </RenderProfile>. Now you can create the custom section in this space, with tags that tell the engine which category of settings it contains. Then you will enter the new command(s) in a special <quality /> definition. Here's what it looks like:
<Post>
<quality id="ultrahigh" GameDepthOfField="0" />
</Post>
The <Post></Post> tags tell the engine that anything between them relate to the post-processing range of settings, which are controlled by the Post FX in-game setting. The <quality /> definition is necessary to hold any commands, such as GameDepthOfField. And by setting the command to ="0", we're telling the engine to disable the Depth of Field effect. Importantly: you must add an id="" string, and the text within it needs to match the setting you use in the game. That is, launch Far Cry 3, go to the Video Quality section, and look at what the level is for this particular setting (which in this case is the Post FX setting), then use text in the id string to correspond: use id="low" for a setting of Low, id="medium" for Medium, id="high" for High, id="veryhigh" for Very High, and id="ultrahigh" for Ultra.
Remember, the string needs to match the actual level you are using for this particular setting, not your Overall Quality preset level. In the example above, it's telling the engine that when my in-game Post FX setting is set to Ultra, Depth of Field should be independently disabled.
To add more Post FX-related settings, insert each one a single blank space after the <quality id="" definition shown above, and one blank space away from any other text. For example:
<Post>
<quality id="ultrahigh" GameDepthOfField="0" MotionBlur="0" FXAALevel="0" />
</Post>
Below we start off with Post FX settings, and all of these can simply be added within the existing <Post> section we've just created. Other settings may require the creation of different sections, and this will be explained as we go along.
MotionBlur="1"
By default Motion Blur is in effect only at a Post FX setting of Very High or Ultra. Using the command above, you can enable it (="1") or disable it (="0") independently. The motion blur effect introduces slight blurring to objects in motion. Disabling it removes this blur, and can also improve performance.
CinematicDepthOfField="1"
If set to ="0", this command disables the use of additional Depth of Field effects in cut-scene cinematics. If you want to disable all DoF, you will need to also disable the GameDepthOfField command as covered further above.
SSAOMaxDistance="150"
The command above determines the distance from the player out to which Ambient Occlusion shadowing is in effect. The default level is 50 when Post FX is at Low or Medium in the game, and 100 when it is at High, Very High or Ultra. You can lower its value here to improve performance when using SSAO, though lowering it too much will see SSAO shadowing only appear a few feet away from you as you walk towards objects. Conversely, you can raise this value to increase the range of SSAO shadowing.
Click here for an interactive comparison between FXAA Level at 1 and 2, and here for an interactive comparison between FXAA Level at 1 and 2.
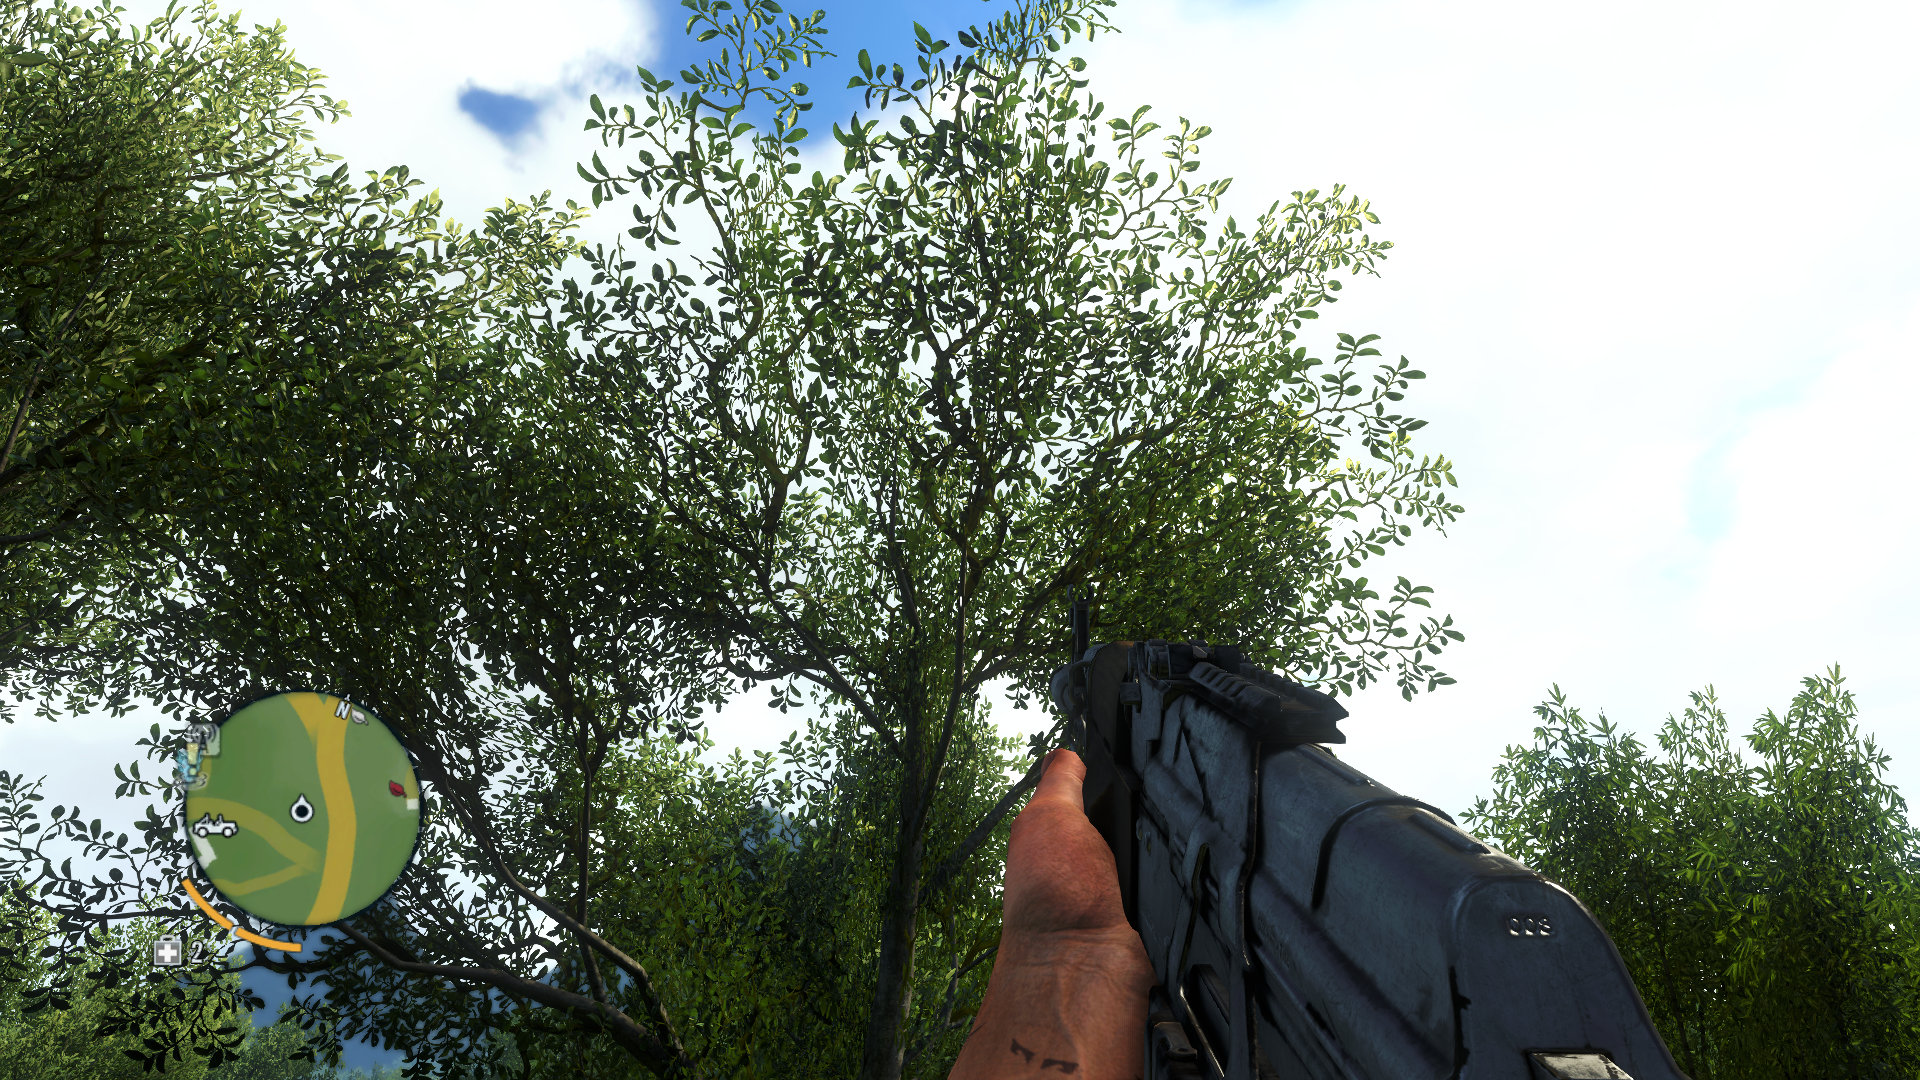
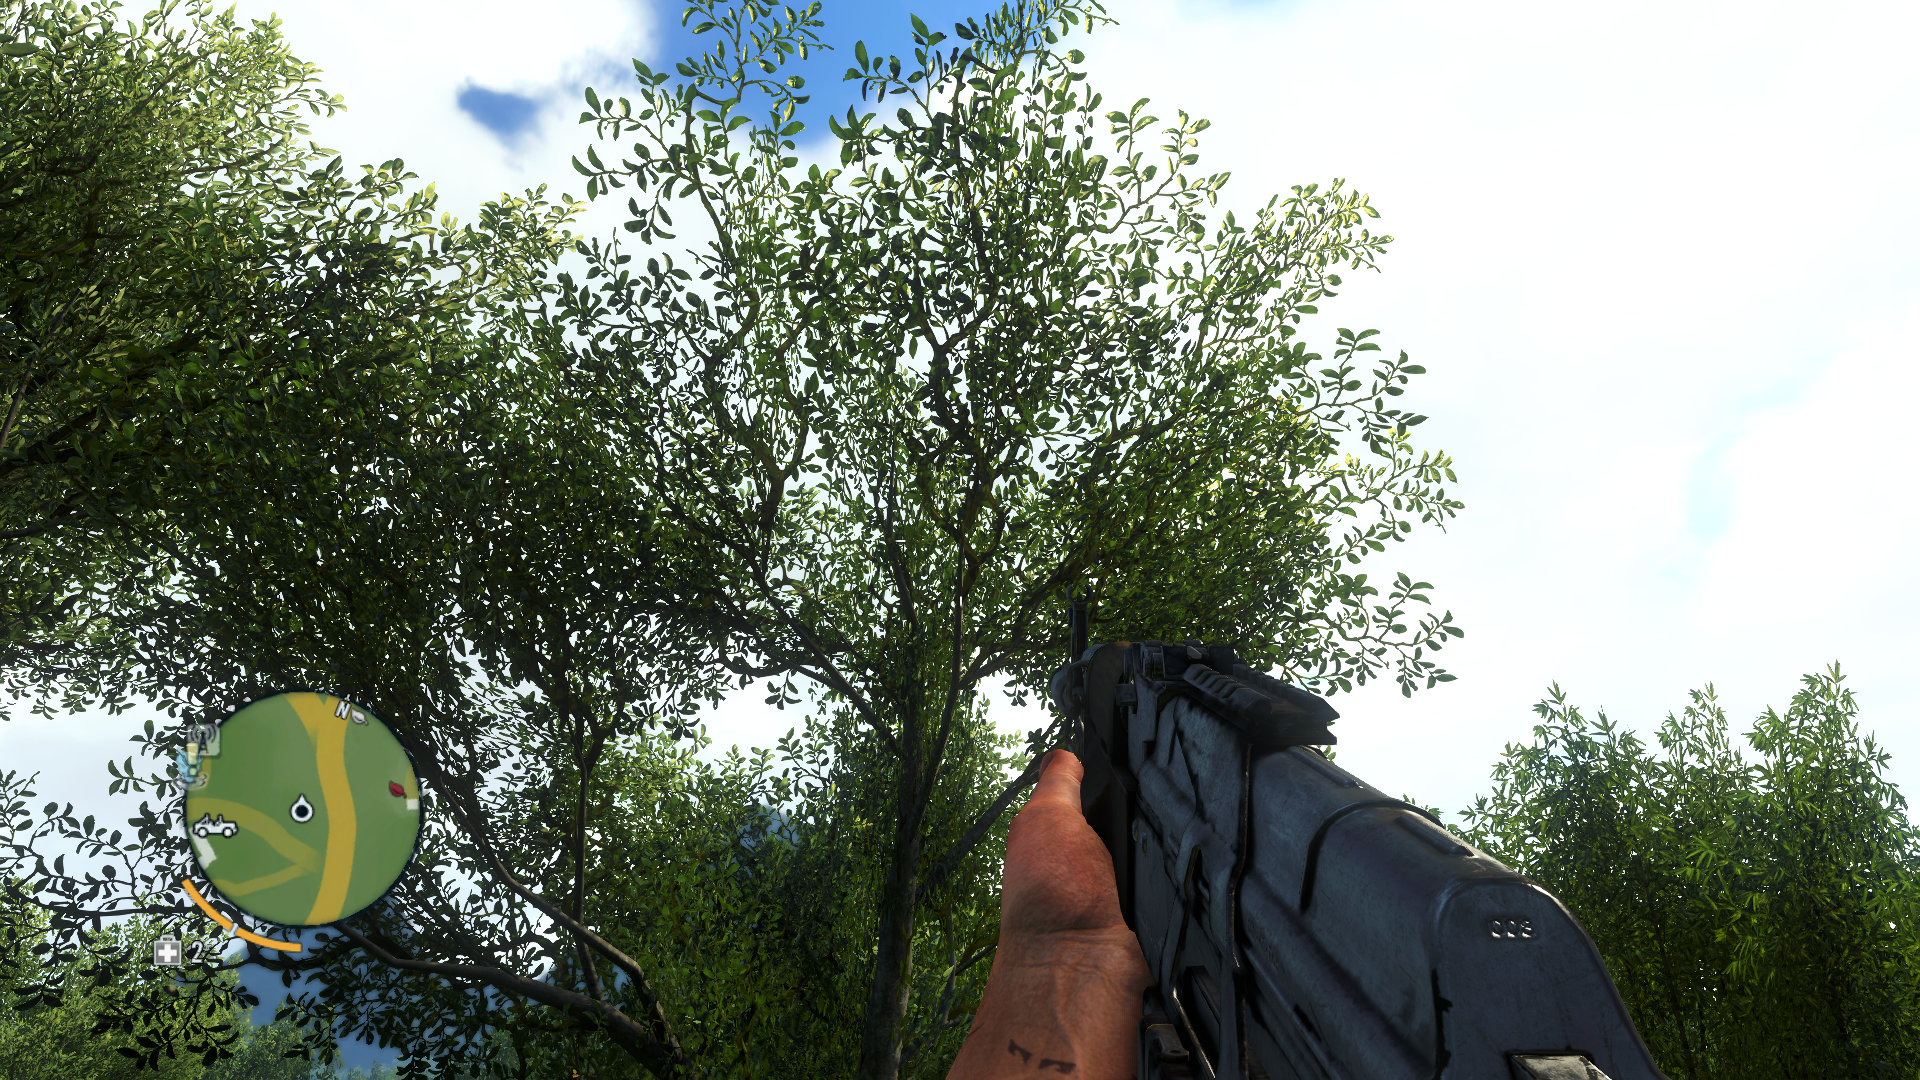
FXAALevel="1"
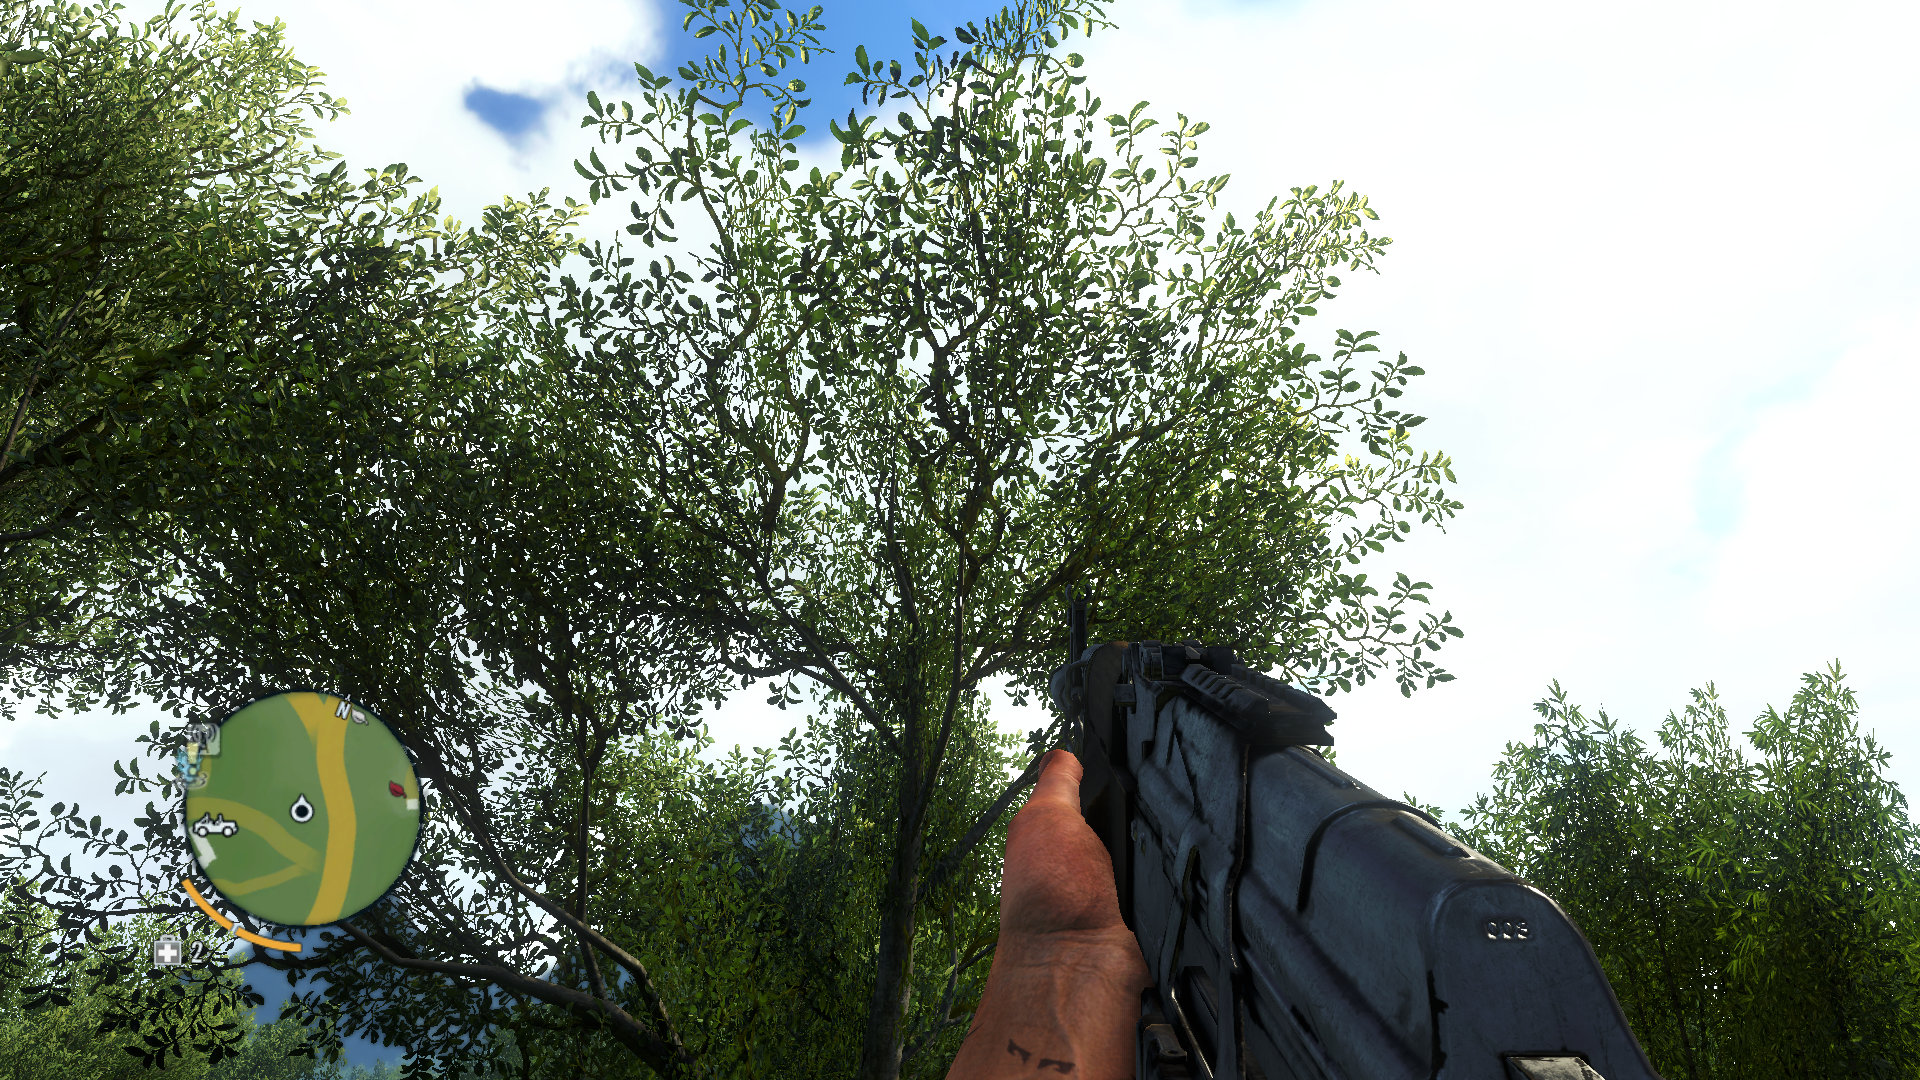
FXAA anti-aliasing is in effect when the in-game Post FX setting is at any level above Low. It helps to smooth out jagged lines, and reduce shimmering, especially when in motion, but can introduce slight blurring to the scene. The command above lets you control it independently of the Post FX setting. Setting it to ="0" disables FXAA, setting it to ="1" enables it, and using a value of ="2" enables a slightly improved form of FXAA at the cost of performance. The screenshots above demonstrate the difference when look at foliage. While there is a noticeable difference between FXAA off (0) and on (1), the change between 1 and 2 is hard to see in a static screenshot, and is witnessed by slightly less shimmering from foliage while moving around in-game.
CloudShadows="0"
This command controls whether clouds can cast shadows, and if set to ="1", this is enabled at the cost of some performance. In practice the visual difference is not particularly noticeable, so you may wish to disable cloud shadows to gain a few FPS.
DepthDownsample="1"
This command controls whether downsampling occurs in the depth buffer. If enabled (="1"), this technique will reduce the quality of particle effects in return for a boost in performance. Downsampling is used when Post FX is at Medium or Low, but you can also enable it independently at higher Post FX levels to get a major performance boost. In testing its impact during actual gameplay, as well as with strict screenshot comparisons, any difference was difficult to detect.
Environment
The next set of tweaks require the creation of a new Environment section, once again to be located beneath </CustomQuality>, and above </RenderProfile> in GamerProfile.xml. It will look something like this:
<Environment>
<quality id="high" RainNumSplashesPerSecond="15" />
</Environment>
Remember to change the id="" string to match the level of your own Environment setting in the game (Low, Medium or High).
DisableRain="1"
If set to ="1", this command will disable rain in the game, which will improve performance during rainy periods at the cost of realism.
RainNumSplashesPerSecond="25"
This command determines the amount of rain splashes when rain is in effect. Raising the value will make rain seem heavier, lowering it will thin out the rainfall. For example, you can use this command to reduce the amount of rainfall, so that you get less of a performance drop during rain, instead of completely disabling rain.
Texture
The Texture section needs to be created in GamerProfile.xml, in a similar fashion to the other sections covered above, in the same area, and with your custom id="" string for your particular level of the in-game Textures setting (Low, Medium or High).
TextureFilteringQuality="1"
This command controls the level of texture filtering applied, with a value of ="0" being the best quality, and higher values, such as ="2" being lower quality. In practice, there's no reason to lower texture filtering quality, as it will have a very small performance impact. A better use for this command is if you need to lower the Textures setting to prevent stuttering, but want to maintain good quality filtering, by adding this command and setting it to ="0".
The next page continues the tweaking of GamerProfile.xml.
|
|
|
|
![]()


This work is licensed under a Creative Commons Attribution 4.0 International License.