Far Cry 3 Tweak Guide
[Page 12] Advanced Tweaking
Far Cry 3 uses the Dunia 2 game engine, a highly modified version of CryEngine. This engine is very advanced, and thus is capable of a great many effects. The in-game settings in Far Cry 3 already give you a fair bit of scope in controlling these various effects, but they can be somewhat limited. For example, the Post FX setting bundles a group of special effects together and doesn't let you disable or enable them individually. Luckily, it is possible to directly control the game engine via some advanced tweaking. But be warned, it's not a simple method, so be prepared to do some reading to learn just how it's done.
In the following sections, we cover only the most useful working commands, which have a noticeable impact on performance or image quality.
GamerProfile.xml
The key place for altering advanced settings is in the GamerProfile.xml file, found under your \Users\[username]\My Documents\My Games\Far Cry 3 directory. Before making any changes though, first launch Far Cry 3, and make sure that your in-game settings are all configured as closely as possible to the way you want them, then exit the game. Now, make a backup copy of GamerProfile.xml, and store it somewhere safe.
For any changes to GamerProfile.xml to remain in effect, you must make the file read-only. Otherwise when you launch Far Cry 3, it will automatically overwrite your changes at some point, typically when you change any in-game settings. So every time you edit the file, save and exit it, then right-click on it, select Properties, tick the 'Read-only' box and clicking Apply. Keep in mind that as long as this file is read-only, any changes you make to any settings while in Far Cry 3 will not be saved.
GamerProfile.xml can be altered using any text editor, such as Notepad, or the more advanced Notepad++, a free application that highlights and differentiates settings and values, making config file editing easier. Read the instructions below to see how to correctly edit it.
The structure of Gamerprofile.xml's contents will appear confusing at first. Different sections are denoted by tags (e.g. <RenderProfile> </RenderProfile> for graphics settings), and the commands that alter various settings can be found within these sections. Most of the commands that are already defined in the file don't need to be manually changed, as they can be fully altered using the in-game settings. To start with, we look at some useful existing commands that can't be changed in the game, but can be altered via the file.
D3D11MultithreadedRendering="1"
If the command above is set to 1, it will enable multithreaded rendering in DirectX 11 mode. This can improve performance, but it may also introduce instability. Test to see the impact on your system.
IronsightToggleMode="1"
If the command above is set to ="1", this will change your controls such that instead of having to hold down the aim button, you can toggle your weapon's iron sights by clicking the aim button once to stay aimed, then clicking the aim button again to go back to normal.
Sensitivity="1.24"
This command is controlled by the Look Sensitivity in-game setting, but here you can set a much higher value than is allowed on the in-game slider if you wish.
The other commands in the GamerProfile.xml file should already be at their optimal value, or should be adjusted via the in-game settings. In particular, when testing the existing Hdr="1", HdrFP32="0" and ReflectionHdr="1" commands, all related to High Dynamic Range (HDR) lighting, I detected no difference in performance or image quality. If you want to experiment, for the highest quality, set them all to ="1", and for lower quality and potentially improved performance, set them all ="0".
The most useful commands are those we need to manually add to GamerProfile.xml. There are several areas in which they need to go. The first of these are commands that can be readily added to the end of the <RenderProfile> section. To do this, find the AllowAsynchShaderLoading="1" part of the file, insert some blank space after the last " and before the >, and add any of these commands, with a blank space separating each command:
Bloom="0"
The command above, when added and set to ="0", will disable the extra light bloom effect that can be seen. In the Screenshots above, you can see that with Bloom disabled, although there is still bright sunlight shining through the clouds in the sky due to HDR lighting, it is less pronounced throughout the entire scene as bloom has been switched off.
SSAOLevel="1"
The command above determines whether Ambient Occlusion is enabled, and what type of AO is used. It is usually controlled by the in-game SSAO Method setting, but there are several reasons why you might want to alter it here. Firstly, it allows you to select Ambient Occlusion modes in DirectX 9 mode, which would otherwise not be possible. Secondly, it lets you disable SSAO in DirectX 11 mode, which is also otherwise impossible. Most important of all, it lets you fine tune the type of AO you wish to use, depending on what looks the best to you. There are seven values for this command, ranging from 0 to 6.
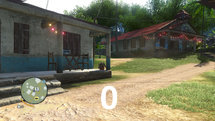
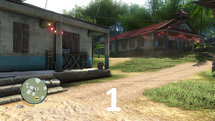
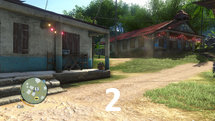
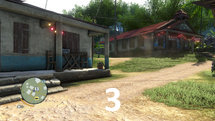
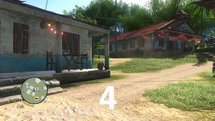
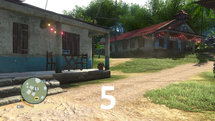
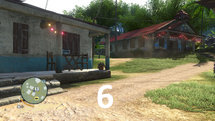
SSAO is equivalent to SSAOLevel="1"; HBAO is SSAOLevel="3"; and HDAO is SSAOLevel="6". All of the screenshots above were taken in DirectX 9 mode, but they also apply to DirectX 11 mode. Starting with no ambient occlusion at SSAOLevel="0", we see no shadowing behind the table, chairs and columns to the left, and beneath the awning. As the setting is altered, different amounts of shadowing appears. Performance will also differ. My personal preference is for SSAOLevel="2", as it is mild, but more effective than no SSAO at all, and does not have the thick black halos that some other SSAO levels have. Experiment to see which suits your tastes and system.
MaxFPS="60"
The command above, when added, will limit your maximum framerate to the number specified. This is useful for preventing FPS spikes, and maintaining more consistent responsiveness. Unlike using VSync, capping your framerate in this manner does not reduce performance or introduce control lag.
GrassWindMin="0.4"
GrassWindMax="2"
These two commands determine how much movement the grass will show due to wind. By raising the GrassWindMin value, grass will sway much more obviously, which can add a bit more life to the game world. For example, try a value of 0.9 for GrassWindMin.
DisableParticles="1"
If you're struggling for performance, especially during combat, then by setting this command to ="1", you will disable the particle system in the game. Particle effects include dust, smoke, and your gun's muzzle flash. These will all be removed when the particle system is disabled, improving performance at the cost of some realism.
The next page continues the tweaking of GamerProfile.xml.
|
|
This work is licensed under a Creative Commons Attribution 4.0 International License.

